
Raspberry Pi OS Rootfs ROMing – How to Add Packages While Making it a RAM Disk
It’s estimated that 94% of enterprise business ventures had adopted IoT technologies by the end of 2021. Yet whether it’s custom hardware or a Raspberry Pi, businesses need to know that the IoT devices they deploy are efficient and reliable. As issues arise during daily operations, it is crucial to have systems in place that can help resolve these problems without requiring specialized staff or skills.
That is precisely what this project aims to do by enabling the removal of the power supply on Raspberry Pi or Raspberry Pi OS.
Testing Environment
- Raspberry Pi 3 Model B+
- Raspberry Pi OS (Lite; 32bit; 2020-12-02)
Note: If You’re on the Raspberry Pi OS, You Can Also Do This Through Raspi-Config
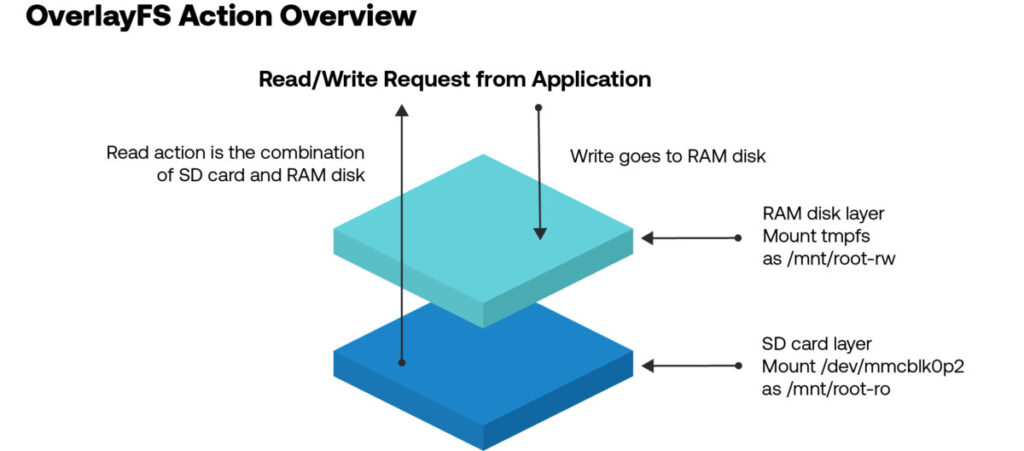
As of 2019, you can easily convert to RAM disk from raspi-config using overlayfs shown here.
Enable RAM Disk
$ sudo raspi-config nonint enable_overlayfs
$ sudo systemctl reboot
## Next time you boot, you will boot the RAM disk using overlayfs.Code language: PHP (php)
Disable RAM Disk
$ sudo raspi-config nonint disable_overlayfs
$ sudo systemctl reboot
## Now the next time you boot, you will boot using microSD.Code language: PHP (php)If You Want to Know the Current Situation
$ sudo raspi-config nonint get_overlay_now && echo "enabled" || echo "disabled"
## enabled / disabled Will Be DisplayedCode language: PHP (php)The process is written as a script in /usr/bin/raspi-config.
Summary
The Raspberry Pi OS root filesystem ROM conversion was performed with reference to
[memo] RaspberryPi: Read-only Root-FS (using overlayfs). The process was further investigated and packaged for personal use.
The conversion was accomplished using overlayfs, following the instructions outlined in
[memo] RaspberryPi: Read-only Root-FS (using overlayfs).
Post-Execution
$ df -h  # 一Omitting Parts
 /dev/mmcblk0p2   30G  1.1G   28G   4% /mnt/root-ro
 tmpfs           464M  712K  463M   1% /mnt/root-rw
 overlay         464M  712K  463M   1% /

 $ mount  # 一Omitting Parts
 /dev/mmcblk0p2 on /mnt/root-ro type ext4 (ro)
 tmpfs on /mnt/root-rw type tmpfs (rw)
 overlay on / type overlay (rw)Code language: PHP (php)
How to Configure Your Own Package and Settings on the Raspberry Pi
There are two ways to install packages and software after following the instructions in
[memo] RaspberryPi: Read-only Root-FS (using overlays).
A: Mount the SD card as RW and boot (in short, revert to normal boot before proceeding)
B: Remount the SD card as RW and then chroot.
Option A requires two separate reboots – one to return to normal bootup, and the other to make rootfs ROM.
Option B can be done on any working Pi device, but requires one reboot when converting to rootfs ROM.
A: How to Mount an SD Card as RW and Boot
In /boot/config.txt, comment out the line that says initramfs initrd.gz and reboot. Then the next boot will not use overlayfs.
You can use apt or edit /etc, as Raspbian is now booted normally on the SD card.
You will need to reboot before doing so. You will also need to revert to RO.
It is recommended that you script the clean-up, as logs and other information will be written during the process and may need to be cleaned up.
$ sudo mount -o remount,rw /mnt/boot-ro
$ sudo sed -i /mnt/boot-ro/config.txt -e 's/^initramfs .*/#&/g'
$ sudo systemctl reboot

## From here, the system will start up normally and configure settings
## e.g.)
$ sudo timedatectl set-timezone Asia/Tokyo

## Last step (= ROing the SD card)
## Clean up here if needed.
$ sudo sed -i /boot/config.txt -e 's/^#(initramfs .*)/1/g'
$ sudo systemctl rebootCode language: PHP (php)
B: Remount SD card as RW and Then Chroot
Mount /mnt/root-ro with read/write, and then chroot as root.
Note: Because the work is done under chroot, it will fail if inter-process communications such as D-Bus are required in the systemd operation.
For example, timedatectl set-timezone Asia/Tokyo will fail if it needs to communicate with systemd. On the other hand, apt install can also be used for simple mechanisms such as deploying files. The script setup_air.sh, which enables Soracom Air to be used with a USB dongle, also worked fine.
As with option A, logs and other data will be written during the work, so cleanup may be necessary. Of course, it is recommended to script the cleanup as well.
$ sudo -s
# mount -o remount,rw /mnt/root-ro
# chroot /mnt/root-ro
# mount -t proc proc /proc

## Configure Settings
## e.g.)
# curl https://soracom-files.s3.amazonaws.com/setup_air.sh
# bash setup_air.sh

## Last step (= ROing the SD card)
## Clean up here if needed.
# systemctl rebootCode language: PHP (php)
Permanent Data Storage on Your Raspberry Pi
This includes things like logs.
- Using Local Persistent Storage
- It is possible to implement it at the bottom of the initramfs
- Management on the cloud side assuming a network
- It is necessary to consider how to deal with network interruptions → Use fluentd , etc.
There’s More to the Raspberry Pi Than You May Think
As we previously mentioned, the Raspberry Pi is a versatile IoT device. Look back through our blog archives to see some tips and tricks to accomplish great things when deploying a Pi with Soracom connectivity. Some topics include:
- How to Provision a Raspberry Pi Manually
- How to Change Your Raspberry Pi Image File
- Can You Scale an IoT Deployment with Raspberry Pi?
- And more!
………………
Got any questions about an IoT deployment? Soracom offers a number of powerful solutions that have made us a visionary in the IoT space. Chat with us today to learn how a partnership with Soracom can get your project up and running easily and securely. Contact us today!


MORE LIKE THIS


What is Soracom?
Discover why technology innovators choose Soracom for connecting their
devices to the cloud over cellular.

Soracom's Picks
Advices and interviews, to inform and inspire.


Security Shouldn’t Depend on the Device: Introducing Soracom Traffic Filtering
TL:DR There’s a quiet paradox at the heart of IoT…

Soracom-KDDI’s Recognition as a Leader in the Gartner® Magic Quadrant™
TL;DR A New High-Water Mark for Soracom This has been…

eSIM vs. iSIM: The Battle for the Smallest Square Inch
TL;DR The Paradox of Shrinking Devices There’s a quiet tension…


Cloud Native
IoT Connectivity Platform
Soracom built the worlds first cloud-native connectivity management platform, built on AWS. Learn more about going beyond connectivity.