How to Send Location Data to Amazon Location Service Using Soracom Beam

Soracom Beam is a powerful IoT protocol conversion tool that does more than reduce data usage and power needs to maximize device output. It can also be used to integrate Amazon Location Service tracking to better secure your deployment.
By restricting access to Amazon Location Service (ALS) tracking in your AWS account to only allow Soracom’s AWS account running Beam, you can:
- Simplify Credential Management: There’s no need to install credentials on the device for sending data to ALS.
- Streamline Data Transfers: Devices can easily send location and other data to ALS by specifying and accessing a Beam entry point. The device doesn’t even need to perform the complex Signature version 4 signing process.
Note: HTTP entry points are not available for sending or retrieving data to Tracking. To accomplish this task, please use website entry points as outlined in this guide.
Create an IAM Role and Assign it to Soracom’s AWS Account
In this step, we will create an AWS IAM role in your account to allow access to your desired tracking application and assign it to the SORACOM AWS account running Beam.
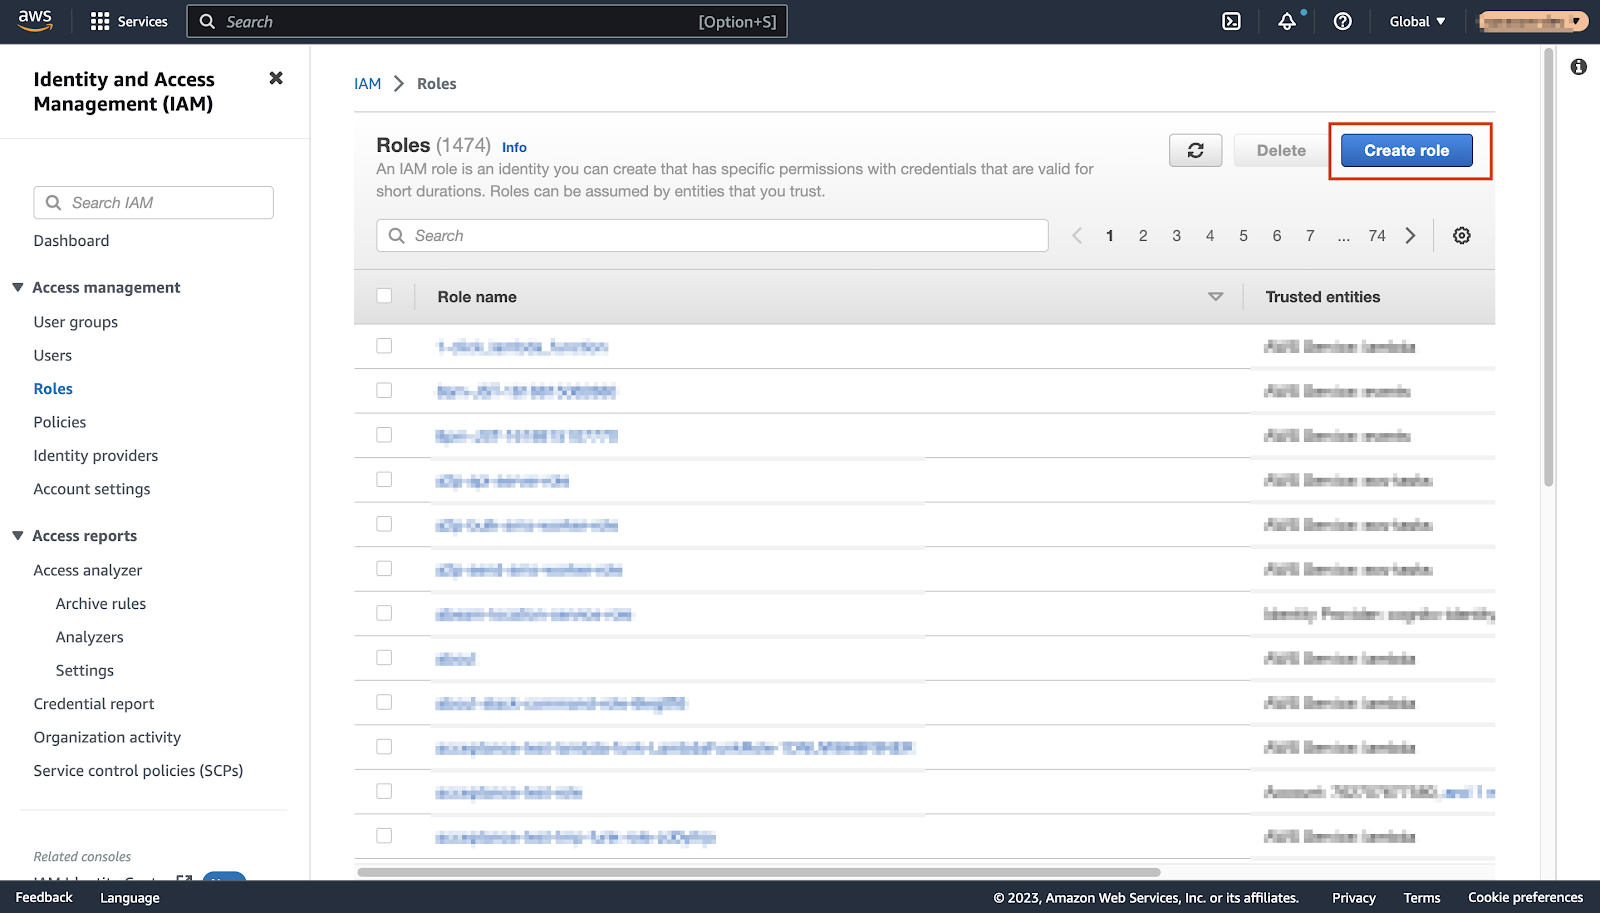
1. From the AWS platform, Click the button to access the IAM console
Then click on [Access management] -> [Roles].
Click [Create role] to proceed.
2: Assign the IAM Role to Soracom’s AWS account
Click on [AWS Account] and then [Another AWS Account].
Enter the account ID for Soracom’s AWS account running Beam in the [Account ID] field.
This ID will vary depending on the coverage type.
- Japan-only coverage: 762707677580
- Global coverage: 950858143650

3: Enter The External ID
Check the box labeled “Require External ID” and input an arbitrary string in the open field. The string input in the external ID field will be referred to as “${external_id}” in the future.
Example: “${external_id}” in the future. Example: External-ID-tsqTJAB7LvQe0JtF

For more information on external IDs, please refer to “How to Use External IDs When Granting Access to AWS Resources to Third Parties – AWS Identity and Access Management” in AWS.
4. Click [Next]
This should open the [Add Permissions] screen.
5. Click [Create Policy]

The [Create Policy] screen should appear in a new window or tab. You will create the policy from this screen.
Once you have created the policy, go back to the [Add Permissions] screen where you started and continue creating the IAM role. Do not close the screen.
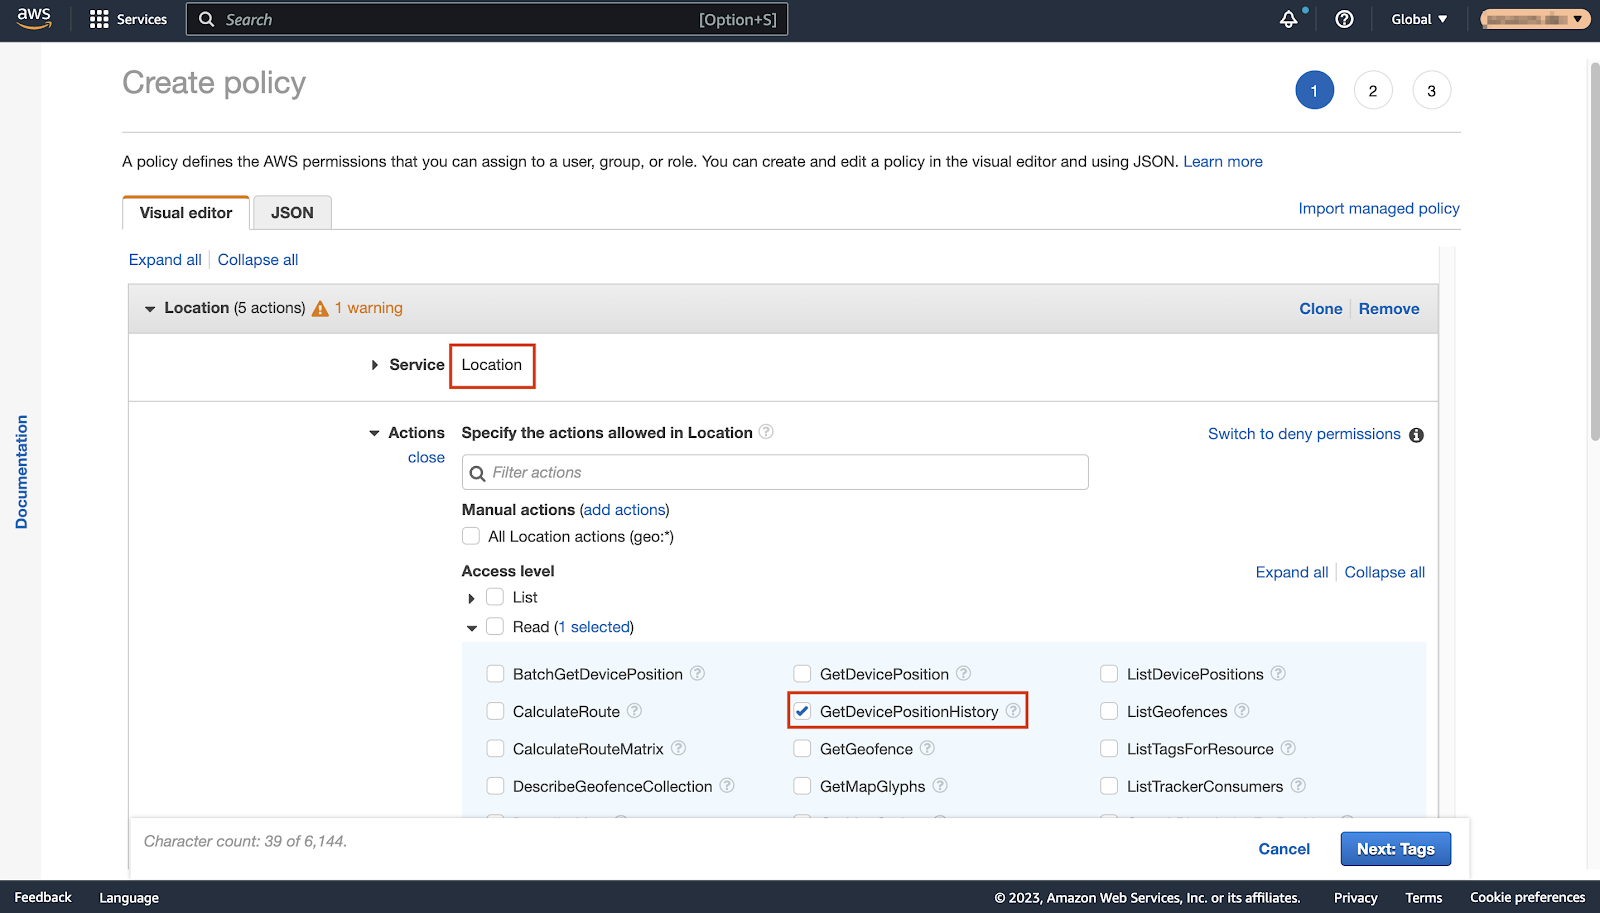
6. From the [Add Permissions] Screen, Set the Following Items:
Item Description
[Service] Click [Select Service] and click [Location].
[Action] Check the following privileges. You can filter by entering the following string in [Filter Actions].
- [GetDevicePositionHistory]
- [TagResource]
- [BatchUpdateDevicePosition]
- [CreateTracker]
- [UpdateTracker]

7. Click in the Following Order:
[Resources] → [Specify] → [tracker] → [Add ARN]

The [Add ARN] screen will be displayed.
8. Enter the ARN of Amazon Location Service in your AWS account
Enter the ARN of Amazon Location Services (e.g. arn:aws:geo:ap-northeast-1:XXXXXXXXXXXX:tracker/*) in [Specify ARN of Location tracker] and click [Add].
9. Return to the [Create Policy] screen.
Click [Next Step: Tags] then [Next Step: Review].
Then enter a name for the AWS IAM policy in [Name], and click [Create Policy].
The AWS IAM policy has now been created, and the policy screen will be displayed.
10. Close the Window or Tab With the Policy Screen
Return to the [Add Permissions] screen.
11. Click  , Enter the Name of the AWS IAM Policy From Step 10 in the Text Box
Then press the Enter key.

The created AWS IAM policy will be displayed.
12. Check the Created AWS IAM Policy
Click [Next].
13. Enter a Name for the IAM role in [Role Name]
Then click [Create Role].

This should return you to the role screen.
14. Click on the Name of the Created IAM Role and Note the [ARN].
This ARN will be referred to later as ${iam_role_arn}. Example:
arn:aws:iam::XXXXXXXXXXXX:role/beam-tracker-role

Set up Soracom Beam
Now it’s time to set up the Beam website entry point. By following the process outlined below, the following functions can be realized:
- Transferring data sent from devices using IoT SIMs to the AWS tracker via Beam.
- Retrieving data stored in the AWS tracker from devices using IoT SIMs.
1. Register AWS IAM Role Authentication Information in the Authentication Information Store.
To call an AWS Lambda function from Beam, register the authentication information related to the IAM role in the user console’s authentication information store.
The authentication information is ${iam_role_arn} and ${external_id}.
For information on how to display the [Register Authentication Information] screen in the authentication information store, see Registering Authentication Information.
The authentication information is registered as follows:
| Item | Description |
| [Credential ID] | Enter any name to identify the credential. Example: AWS-IAM-role-credentials-tracker |
| [Type] | Select “AWS IAM Role Credentials”. |
| [Role ARN] | Enter ${iam_role_arn}. Example:arn:aws:iam::XXXXXXXXXXXX:role/beam-tracker-role |
| [External ID] | Enter ${external_id}. Example: External-ID-tsqTJAB7LvQe0JtF |

Set up the Beam Web Site Endpoint
Beam setup is performed in a group. In this section, we will explain the steps necessary to change the setting of that group.
For details on the mechanism of the group and the operation to create one, please refer to Group Setting.
1. Click [Soracom Beam setting] on the SIM group screen.
For details on how to display the SIM group screen, see Changing a Group Setting.
2. Click [+ Add Setting] → [Web Site Endpoint].
This should bring up the [Soracom Beam – Web Site Transfer Setting] screen.
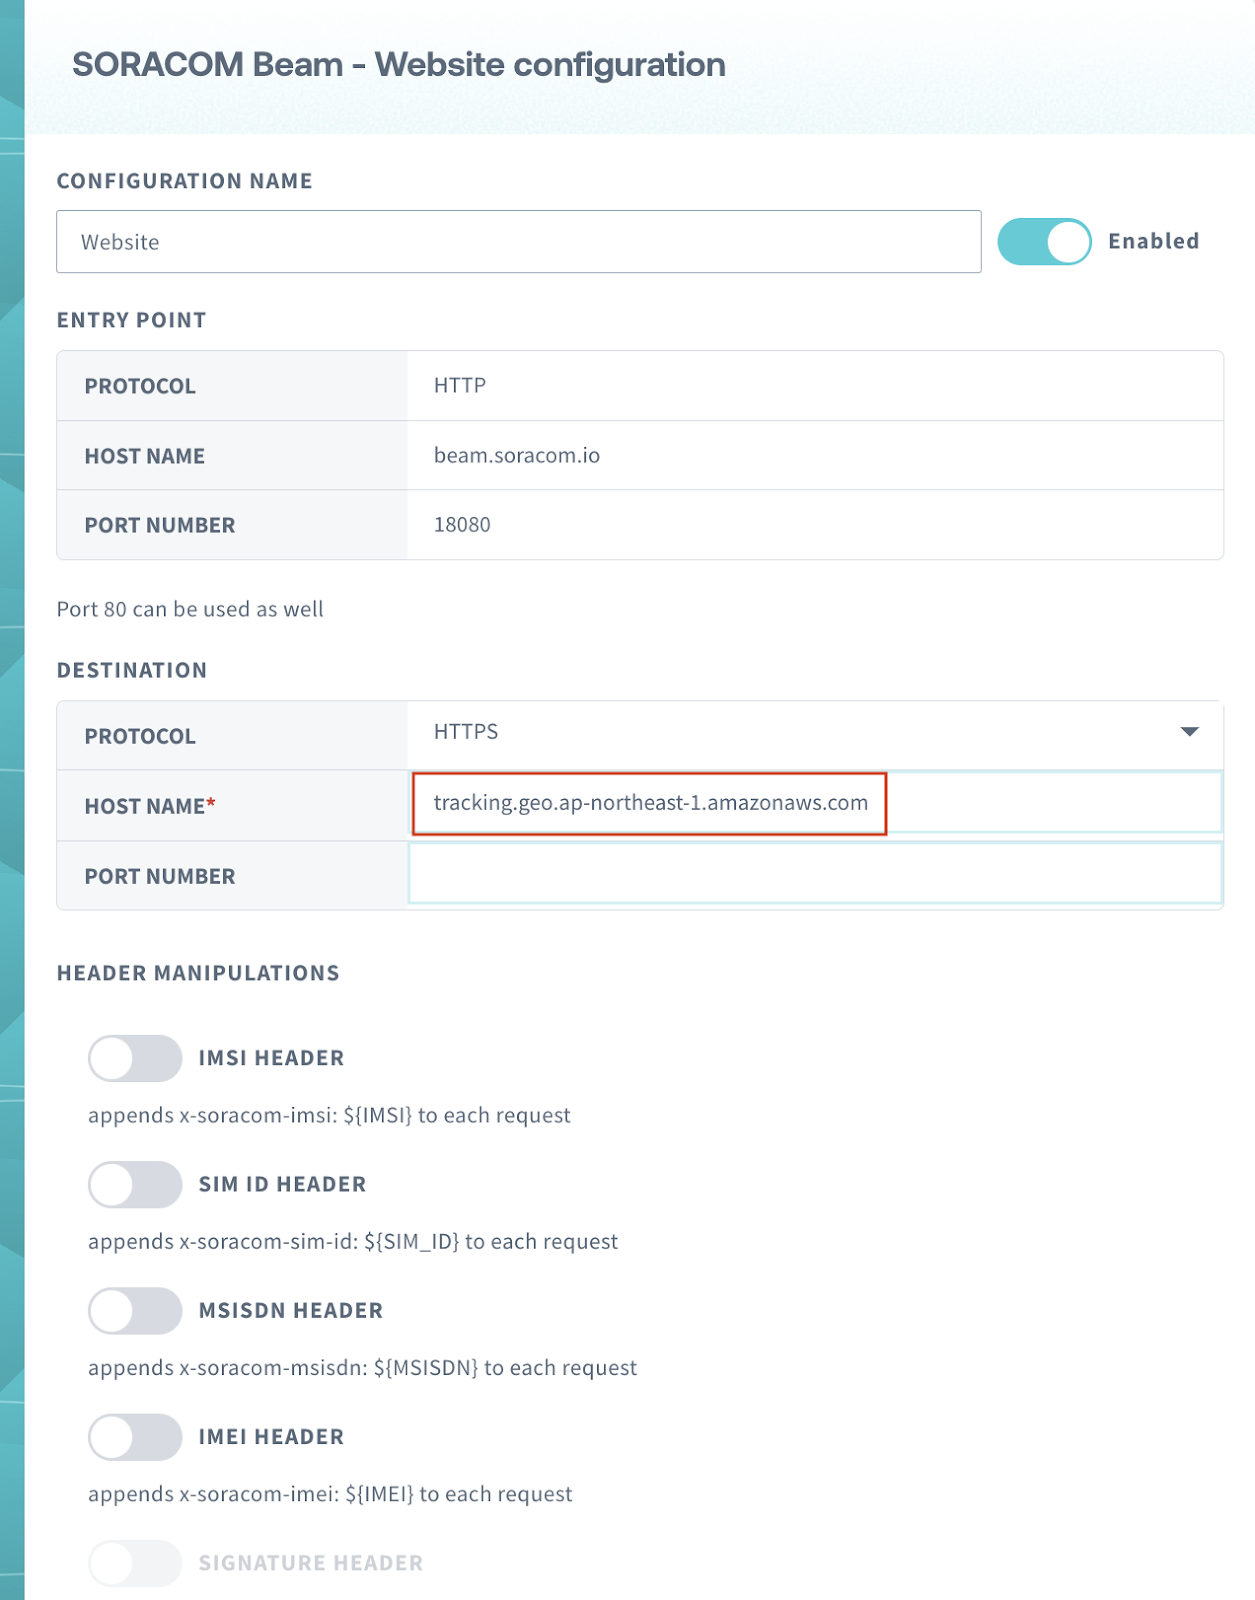
3. Set it Up As Follows.
| Item | Description |
| [Setting Name] | Enter an arbitrary setting name (e.g. Amazon Location Service Tracking). |
| [Destination] → [Protocol] | Select「HTTPS」. |
| [Destination] → [Hostname] | Enter tracking.geo.${Amazon Location Service region}.amazonaws.com (e.g. tracking.geo.${Amazon Location Service). |
| [Destination] → [Portn number] | Leave it blank. |
| [Header Operation] → [AUTHORIZATION Header] | Turn it on and set it up as follows. [Type]: 「AWS Signature V4」 [Service]: 「geo」(Amazon Location Service) [Region]: Select the region of your Amazon Location Service [Authentification Information ID]: Select the AWS IAM role authentication information registered in “Registering AWS IAM role authentication information in the authentication information store“. |

The meaning of the Web Site Entry Point setting values can be found in the Web Site Entry Point.
Then Click [Save]
4. Switch Which Group the IoT SIM Belongs To
This should complete the Beam setting for the IoT SIM.
Activate Air’s Metadata Service
In the next steps, we will use Air’s metadata service to send data from the device to the AWS tracker. To do so, we must first enable Air’s metadata service for the group to which the IoT SIM belongs. For more information, see Setting up Metadata Service.
| Item | Description |
| [Meta Data Service] | Turn it on. |

Send Data to the AWS Tracker Using the Web Site Entry Point
You can use the Beam Web Site Entry Point to send and receive location information to the AWS tracker.
Create a Tracker
Create a tracker named “beam-tracker” in AWS Tracking.
1. Install the Requests Package on the Device
$ pip install requests
2. Download create_tracker.py on the Device
Note: create_tracker.py is a sample script that uses the metadata service to get the IMSI and create a new tracker named beam-tracker in AWS Tracking.
3. Execute the Following Command on the Device to Create the Tracker
$ python create_tracker.py
8942XXXXXXXXXXXXXXX
{'TrackerName': 'beam-tracker', 'TrackerArn': 'arn:aws:geo:ap-northeast-1:XXXXXXXXXXXX:tracker/beam-tracker', 'CreateTime': '2023-01-11T12:20:04.118Z'}Code language: JavaScript (javascript)Sending Data
1. Download send_locations.py to the Device.
send_locations.py is a sample script that uses the metadata service to get the IMSI and sends three fixed location information to the “beam-tracker” tracker in Tracking at an interval of 2 seconds.
2. Execute the following command on the device to send three location information:
$ python send_locations.py
Receiving Data
1. Download get_locations.py to the device.
get_locations.py is a sample script that uses the metadata service to get the IMSI and retrieve the past 3 days of location information from the “beam-tracker” tracker in AWS Tracking.
2. Execute the following command on the device to retrieve the location information:
$ python get_locations.py

{'DevicePositions': [{'DeviceId': 'beam-tracker-8942XXXXXXXXXXXXXXX', 'SampleTime': '2023-01-19T09:50:09.933Z', 'ReceivedTime': '2023-01-19T09:50:13.177Z', 'Position': [139.7583, 35.6664], 'Accuracy': {'Horizontal': 1}}, {'DeviceId': 'beam-tracker-8942XXXXXXXXXXXXXXX', 'SampleTime': '2023-01-19T09:50:15.951Z', 'ReceivedTime': '2023-01-19T09:50:16.522Z', 'Position': [139.7501, 35.6701], 'Accuracy': {'Horizontal': 1}}, {'DeviceId': 'beam-tracker-8942XXXXXXXXXXXXXXX', 'SampleTime': '2023-01-19T09:50:18.733Z', 'ReceivedTime': '2023-01-19T09:50:19.3Z', 'Position': [139.744207, 35.669823], 'Accuracy': {'Horizontal': 1}}]}
Code language: JavaScript (javascript)
………….
Do you have questions about this process or another IoT project? Speak with one of our experts today to learn how Soracom has helped more than 20,000 innovators deploy, scale, and secure their IoT projects.