Geofencing with Soracom Beam Signature V4 Feature and Amazon Location Service

Hey there! My name is Taketo, and I’m a Solution Architect here at Soracom.
Today, I want to share a new and exciting integration that’s been making waves in the tech world. I’m talking about integrating Amazon Location Service (ALS) with Soracom Beam, a data transfer service that is now compatible with AWS Signature V4. This integration is a game-changer, and I’m excited to dive into what it can do for you and your deployment.
With the integration of ALS and Soracom Beam, you no longer have to worry about managing authentication information and SigV4 generation logic on your device. This makes it much easier to send your device’s location information to ALS and store it there, or use the Geofence function to detect when your device enters a specific area and trigger actions like sending notifications. The possibilities are endless!
It is that latter feature that this blog will focus on. Together, we’ll take a closer look at what geo-fencing is, how it works, and how you can use it to enhance your location-based applications. So, let’s get started!
Note: If you want to learn more about how to link your device to the Amazon Location Service’s Tracking service for storing location information, please refer to our recent blog: How to Send Location Data to Amazon Location Service Using Soracom Beam.
What is Amazon Location Service?
Amazon Location Service is a location-based service from Amazon Web Services (AWS) that provides location information for various use cases such as mapping, geofencing, and more. It was designed to make it easy for developers to build location-based applications. As stated on their website:
“Amazon Location Service is a location-based service that developers can use to add geospatial data and location capabilities to their applications. Customers can visualize data and route recommendations on maps, convert plain text addresses to geographic coordinates using geocoding, convert latitude and longitude coordinates to addresses using reverse geocoding, and monitor and track assets such as vehicle fleets. Assets such as vehicle fleets can be monitored and tracked.”
Amazon Web Service
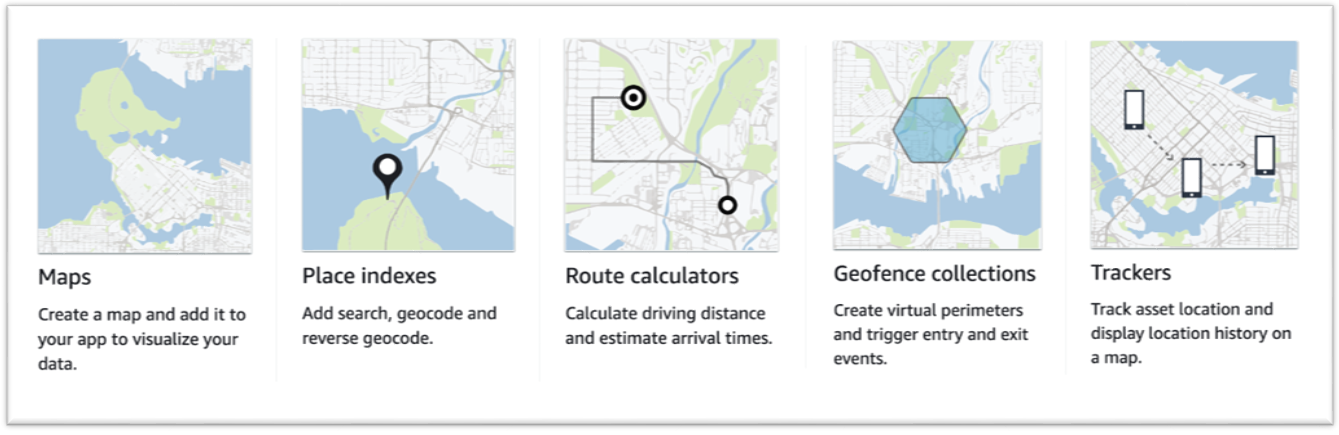
ALS has five main functions, as listed on the official AWS website: Amazon Location overview
- Maps: This function allows you to display maps in your custom applications.
- Place Indexes: This function enables you to search for location information, such as converting the text “Tokyo Skytree” into its actual latitude, longitude, and address.
- Route: This API calculates optimized routes based on two sets of latitude and longitude information, even taking real-time traffic conditions into consideration. These routes are displayed with automotive travel in mind and include the time required to complete them.
- Trackers: This API stores device location information and can be used in conjunction with Maps to display the location of devices.
- Geofencing: The feature allows you to define virtual boundaries around a specific location. When a device tracked by the Trackers API enters or exits this pre-defined area, an event is triggered and linked to Amazon EventBridge. These events include notifications that can be activated and returned through EventBridge.
These features provide a comprehensive solution for developers looking to incorporate location data into their projects, making it easy to add mapping, navigation, and location-tracking functionality to your applications.
Exploring Geofencing
Once you’ve defined your virtual boundaries, you will want to know when and if a device enters or leaves your deployment area. This guide will provide an example of how to send an email notification should the geofence area be crossed by using ALS. For implementation, please also refer to the official AWS documentation: Geofencing an area of interest using Amazon Location.
1. Send Location Information to Amazon Location Service Tracking
Before setting up a geofence, you must configure your device to send location information to Amazon Location Service. To do this, follow the instructions in the previously mentioned blog.
2. Creating a Geofence Collection
Next, create a Geofence Collection from Amazon Location Service and set up EventBridge rules for seamless integration with notification services. Add the coordinates of the area you want to monitor to the Geofence Collection. You can use geojson.io to design different types of geofences and download the JSON files. Check out the AWS Official Guide: add geofence on adding a geofence to learn how to register the information in your downloaded geofence collection.
For this example, we’ll set up a geofence around the Soracom office in Akasaka, Tokyo, to detect devices entering and exiting the area.


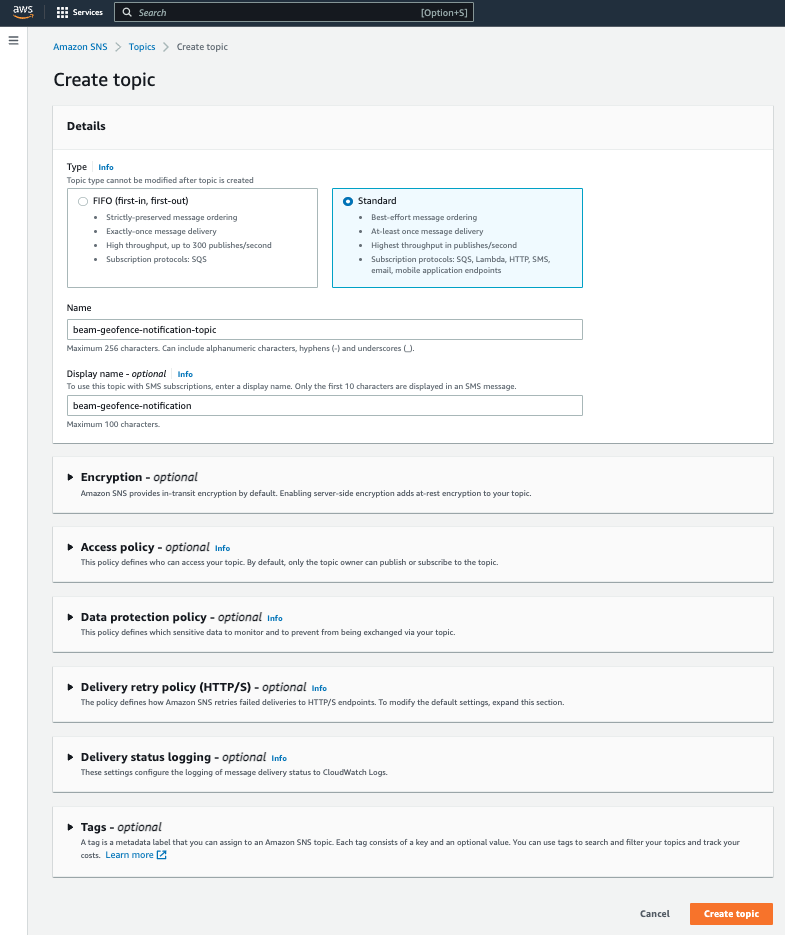
3. Creating Amazon Simple Notification Service
In this guide, we’ll use Amazon Simple Notification Service (SNS) to create a system for sending email notifications when an event is triggered.

4. Amazon EventBridge and Amazon SNS Integration
Edit the EventBridge rule in the Amazon Location Service’s Geofence Collection and set the Amazon SNS topic created in the previous step as the target. This will create a system for emailing through Amazon SNS when Amazon Location Service detects a geofence event.

5. Edit IAM Role Permissions
Edit the IAM role created in Step 1 to add the “geo:AssociateTrackerConsumer” privilege. This is necessary to run the API that links device location information with geofences.
Below is an example of IAM role permissions after editing:
| { “Version”: “2012-10-17”, “Statement”: [ { “Sid”: “VisualEditor0”, “Effect”: “Allow”, “Action”: [ “geo:GetDevicePositionHistory”, “geo:AssociateTrackerConsumer”, “geo:TagResource”, “geo:UpdateTracker”, “geo:BatchUpdateDevicePosition” ], “Resource”: “arn:aws:geo:ap-northeast-1:***:tracker/*” }, { “Sid”: “VisualEditor1”, “Effect”: “Allow”, “Action”: “geo:CreateTracker”, “Resource”: “*” } ] } |
6. Associating Trackers with the Geofencing Area
From the device, send a request to register the device’s location information as a target for monitoring in the geofence collection.
| #Link tracker with geo fence import requests import json geofence_arn_akasakaoffice = “{The arn of created Geofence Collection in step 2}” ls_trackers_consumer_url = “http://beam.soracom.io:18080/tracking/v0/trackers/” + tracker_id + “/consumers” consumer_request = { “ConsumerArn”: geofence_arn_akasakaoffice } linked_tracker = requests.post(ls_trackers_consumer_url, data=json.dumps(consumer_request)).json() print(linked_tracker) |

7. Sending Location Data and Receiving Notifications from the Device
Now, it’s time to test the system by sending location data from the device and verifying that email notifications are being received.
Following the instructions step ‘1. Download send_locations.py to the Device’ from the aforementioned blog post, send location information as you move in and out of the geofence. In this case, we will be transitioning between local train stations (specifically from Shimbashi Station to Toranomon) before heading to the Soracom office. We will be doing this at 2-second intervals.
In this example, you’ll receive an email almost instantly with the event information. Including “Enter” in the EventType field indicates that the device has entered the Geofence.
| #Update device positions import requests import json import datetime import time ls_trackers_positions_url = “http://beam.soracom.io:18080/tracking/v0/trackers/” + tracker_id + “/positions” locations = [[139.7583, 35.6664], [139.7501, 35.6701], [139.744207, 35.669823]] for location in locations: update_location = { “Updates”: [ { “Accuracy”: { “Horizontal”: 1 }, “DeviceId”: device_id, “Position”: location, “SampleTime”: datetime.datetime.now(datetime.timezone.utc).strftime(‘%Y-%m-%dT%H:%M:%S.%fZ’) } ] } updated_tracker = requests.post(ls_trackers_positions_url, data=json.dumps(update_location))#.json() print(updated_tracker) time.sleep(2) |
Note: As of February 2023, Soracom Beam supports AWS Signature V4 for “HTTP Entry Point” and “Website Entry Point.” However, it does not support sending data via TCP/UDP, etc.
In Conclusion: Geofencing and Beyond
There are numerous possibilities for device tracking in IoT projects, and using Amazon Location Service to manage location data is an effective solution. Soracom Beam adds a layer of security and ease of integration to this process. With Beam, you can easily and securely transfer location data, making it a valuable tool for your projects.
We hope you find this information helpful and incorporate it into your future endeavors.
………………
Got a question for Soracom? Whether you’re an existing customer, interested in learning more about our product and services, or want to learn about our Partner program – we’d love to hear from you!