How to Build a Wi-Fi Access Point on Raspi and Traffic Measurement (NAPT pattern)
The Internet of Things (IoT) is a technology that leverages the interconnectivity of devices over a network, enabling the exchange of data and remote control of devices through the use of sensors and camera images. As the adoption of IoT continues to expand, there is a growing demand for a deeper understanding of network communication, commonly referred to as traffic. This information is crucial in determining the capacity and usage of the network, as once the traffic is known, the following becomes clear:
- The communication speed and bandwidth required for full-scale use
- Estimates for pay-as-you-go network usage in business studies
Traffic can be calculated based on sensor and equipment specifications, but overhead incurred during encryption and system integration can cause significant variations in these factors. Thorough measurement is the best way to get closer to operation, but if there is no traffic measurement mechanism on the sensor or camera side, it may not even be possible.
As such, in this blog, we will introduce a system in which a Raspberry Pi (hereafter known as “Raspi”) is used as a Wi-Fi access point to relay traffic from sensors and cameras while measuring the traffic as well.
Overview
First, we must install ‘hostapd,’ a software that enables a network interface card to act as an access point and authentication server, on the Raspi and configure its wireless LAN interface (wlan0) to be accepted as a Wi-Fi access point. Be sure to use wired LAN (eth0) for communication to the Internet side.
Use dnsmasq for IP address distribution (DHCP) to devices that connect to Raspi via Wi-Fi, and use nftables to perform address translation (NAPT) for communications that pass through Raspi.
We will then use pmacct to measure the traffic passing through the wireless LAN interface.
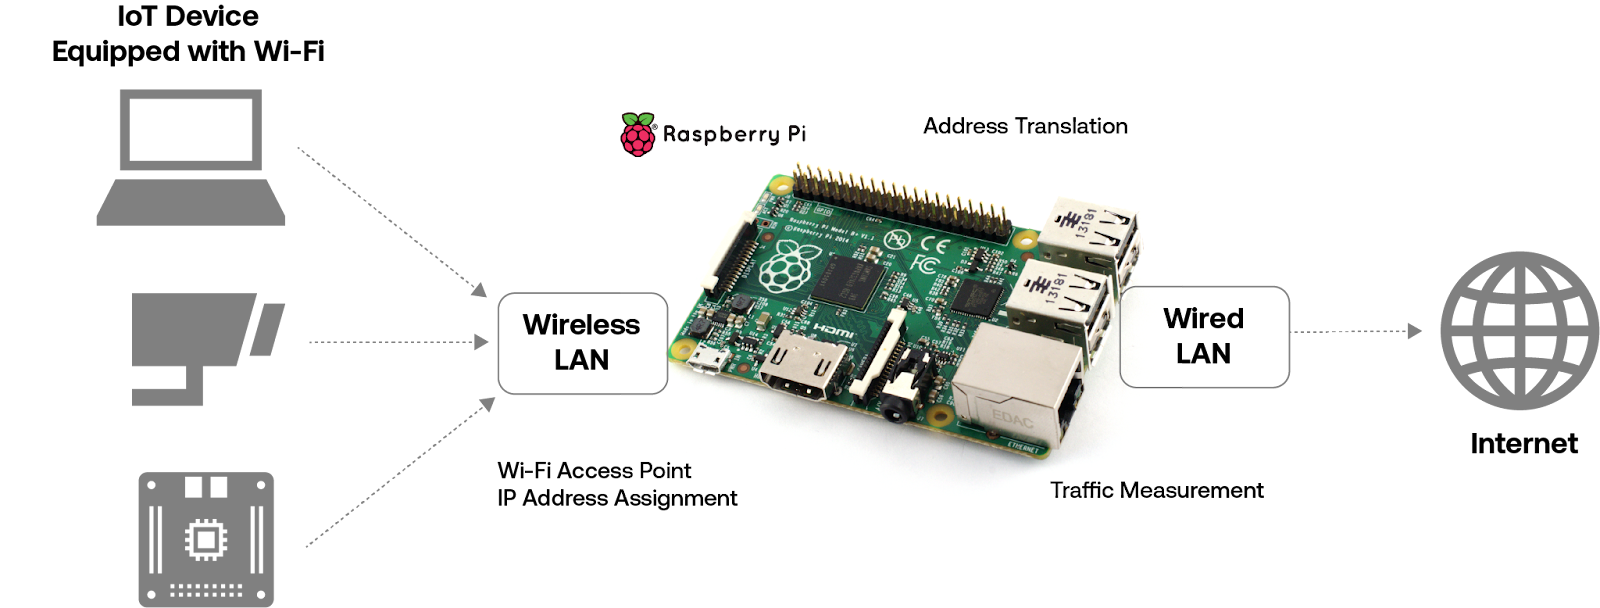
By using NAPT, even if many IoT devices are connected to the wireless LAN side, they can communicate using a single IP address assigned to the wired LAN side, which has the advantage of minimizing the impact on the existing environment.
In addition to the NAPT pattern, there is also the Bridge Pattern for building access points. The construction effort is almost the same, but see the Bridge Pattern (content in Japanese) for the differences in configuration and the advantages of each.
Steps to Build a Wi-Fi Access Point Using Raspi(NAPT Pattern)
Let’s actually build it. It will take about 30 minutes.
We used a Raspberry Pi 3 model B+. You can use any model that has both a wireless LAN and a wired LAN, but we recommend model 3 or 4.
1. Settings when programming with Raspberry Pi Imager
The Raspberry Pi Imager is a popular tool for installing the Raspberry Pi OS, including the Lite version (64-bit).
The settings at the time of programming are as follows.
| Item | Configuration Example | Note |
| Host Name | hostapd-napt | Optional |
| SSH | Enabled | The authentication method is optional. Public key authentication requires an SSH key. If you are not prepared for this, select password authentication. |
| Username and password | FooBar – User name = hostapdPassword = FooBar | Optional. Especially for passwords, please specify an unpredictable string of characters. The use of a password generator tool is also effective. |
| Wi-Fi | No set up | |
| Locale setting | us – Timezone = Asia/Tokyo Keyboard Layout = us | Optional but recommended |
2. Check the Internet Connection From the Raspi’s Wired LAN
Plug a cable into the wired LAN port (eth0) of the Raspi and make sure it can connect to the Internet. The tasks below can also work by remote access via SSH.
3. Updating the OS After the First Boot
After the Raspberry Pi OS has been booted, first update the installation software and libraries. Reboot to complete the update.

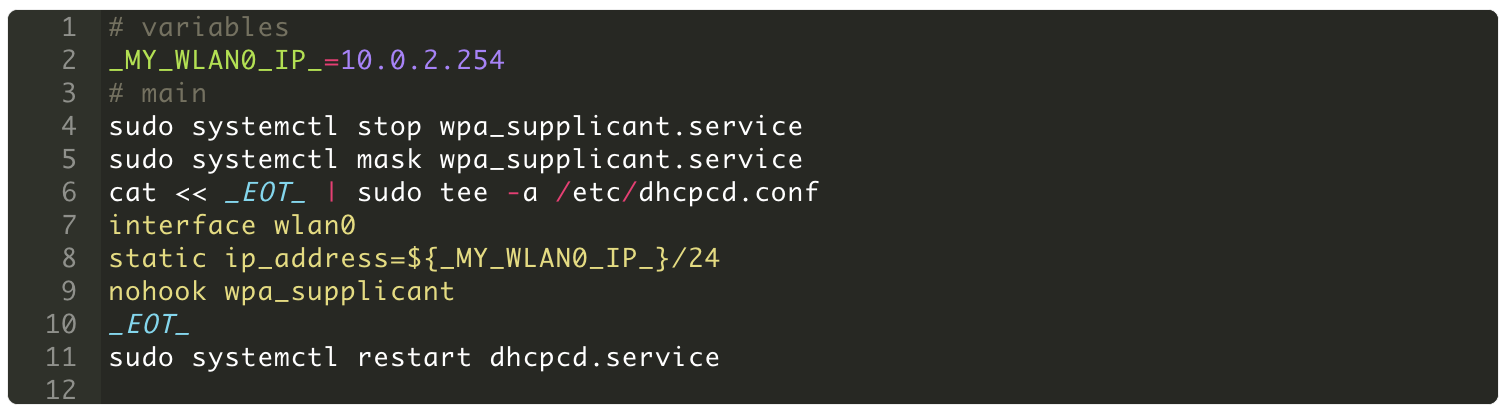
4. Disabling wpa_supplicant Activation by dhcpcd and Assigning a Fixed IP to wlan0
wpa_supplicant is software to pass authentication (WPA) when connecting to a Wi-Fi access point. In this case, since Raspi itself will be a Wi-Fi access point, this software will cause conflicts if it is running, so it will be stopped. At the same time, a fixed IP address is assigned to the wireless LAN interface (wlan0).
We used the address 10.0.2.254 for wlan0. Basically, there is no problem leaving it as it is, but if it conflicts with the network on the eth0 side, please change it.
Confirmation
Use the following command to confirm that the previous configuration has been completed.

5. hostapd for Wi-Fi Access Point
hostapd is a Wi-Fi access point server software. This software allows Raspi’s wireless LAN interface to act as a Wi-Fi access point.
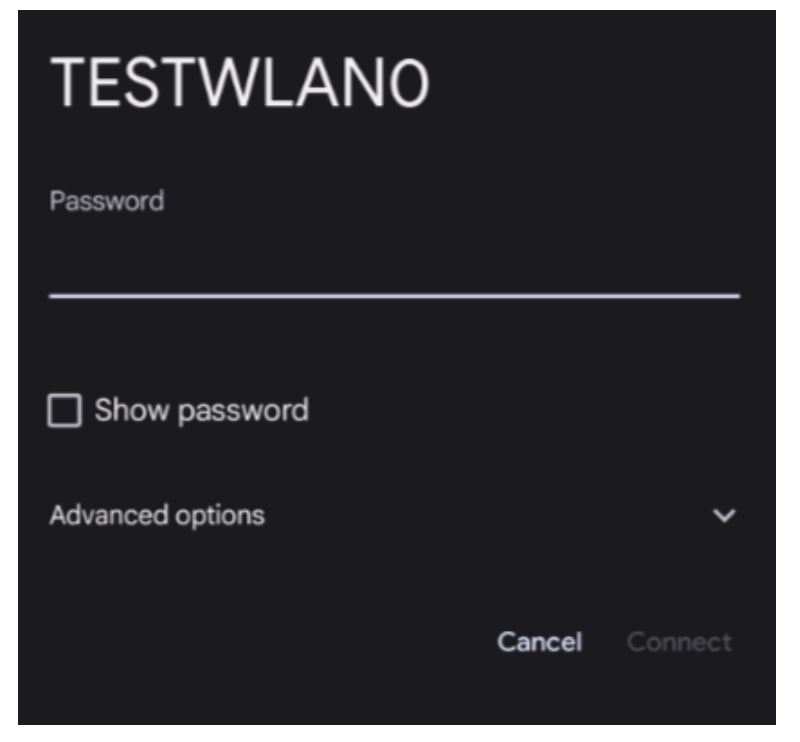
Here, SSID = TESTWLAN0 and password = Aihei2oB are set. You can change these settings to suit your needs.

Confirmation
Use the following command to confirm that the previous configuration has been completed.

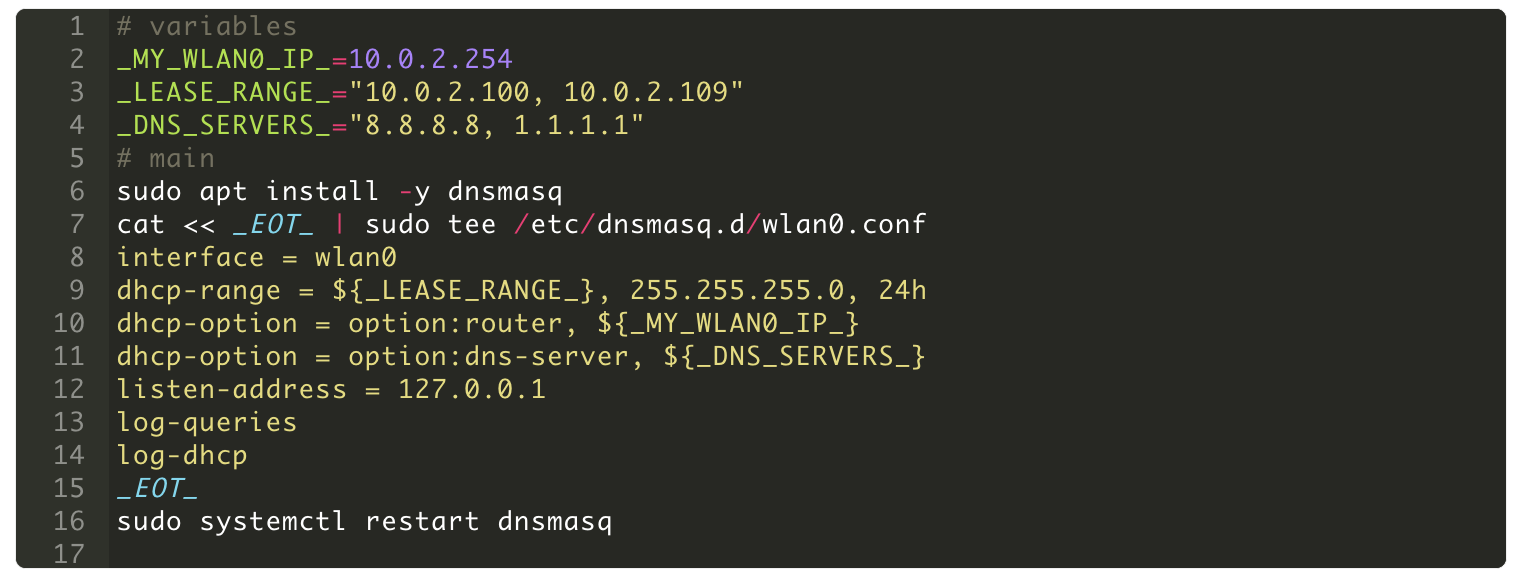
6. dnsmasq DHCP Server
dnsmasq is lightweight DNS/DHCP server software. In this case, the DHCP function is used to assign IP addresses to devices that have connected to the Wi-Fi access point.
The range of IP addresses to be distributed is 10 addresses from 10.0.2.100 ~ 10.0.2.109. In addition, the DNS servers are the addresses of public DNS servers operated by Google and Cloudflare, respectively, for distribution. Both the number of addresses and DNS servers should be fine as-is, but if you need more IP addresses or have DNS server addresses that your organization should use, please change them.
Confirmation
Use the following command to confirm that the previous configuration has been completed.

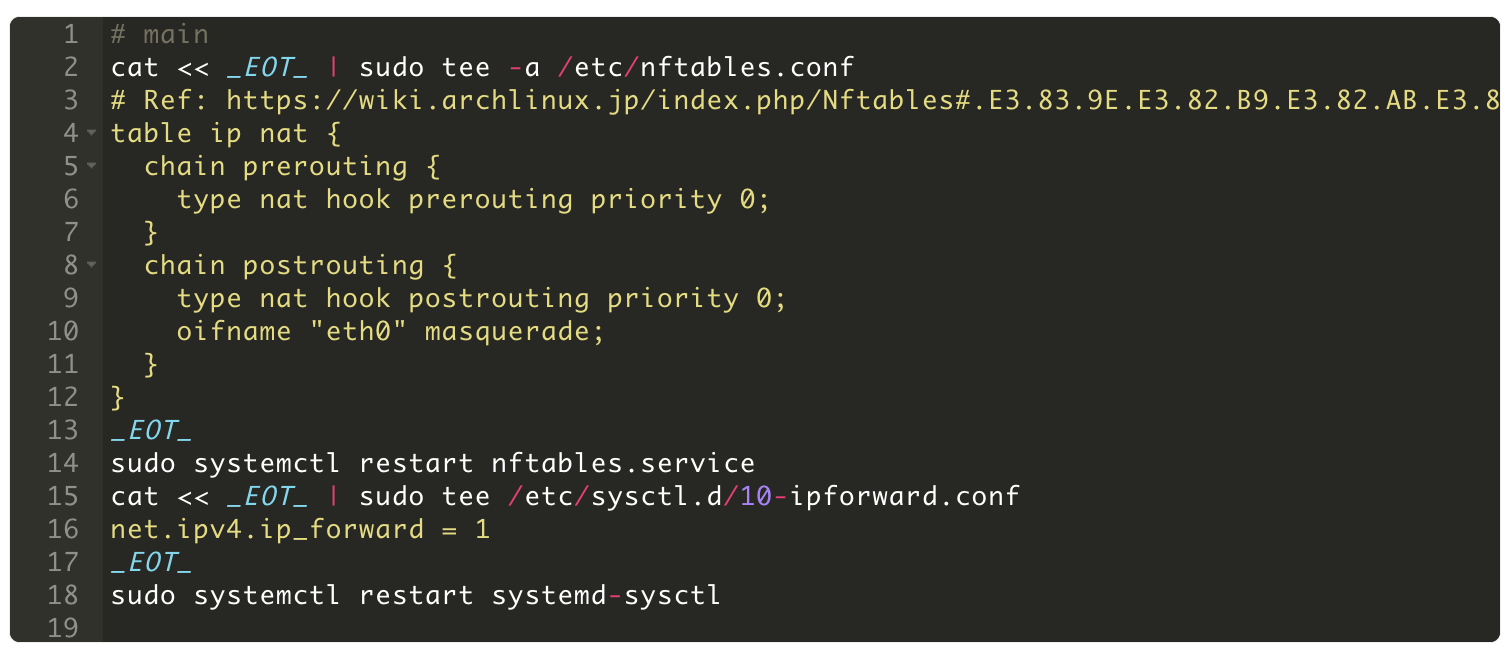
7. nftables for NAPT Gatewaying
nftables is an IP packet filter middleware that integrates iptables and others. In this case, it is used to apply address translation (NAPT) to communications between wlan0 and eth0. We also enable net.ipv4.ip_forward to allow communication between wlan0 and eth0.
Confirmation
Use the following command to confirm that the previous configuration has been completed.

8. Try Connecting to the Wi-Fi Access Point Built with Raspi
Now that you have built a Raspi as a Wi-Fi access point, let’s try connecting to the Wi-Fi access point built with Raspi from your smartphone or PC.
Once connected, check to see if you can view tool sites such as https://ifconfig.io.
Traffic Measurement with pmacct
pmacct is a traffic measurement software. For example, the following will allow you to measure the traffic (traffic volume) passing through a wlan0 interface configured as a Wi-Fi access point.

Every 10 seconds, the following would be output to the screen.

The communication from 10.0.2.100 (= the smartphone used for the check) to 1.1.1.1.1 or 8.8.8.8.8 set as the DNS server, and the communication volume at that time is measured as PACKETS and BYTES. By using this, it is possible to grasp the amount of communication.
Here we simply display the data on the screen, but pmacct also supports storing data in a DB such as SQLite. For details, please refer to Saving the results of the traffic measurement tool “pmacct” in SQLite.
Future Operation – Aiming for Stable Raspi Operation
Although we were able to turn Raspi into a Wi-Fi access point, we would like to run this kind of thing quickly and only during verification. Therefore, please consider “a system that operates only by turning the power on and off” as one way to run Raspi stably.
Soraom Peek for Checking Cellular Communication Traffic
In addition to Wi-Fi, cellular communications such as LTE and 5G are also used in IoT. In this case, please use Soracom Peek, which can capture IP packets on the SORACOM platform.
Soracom Peek can capture in units of SIM (=communication line) or VPG (=network), and its format is pcap format, which can be analyzed by standard packet analyzers such as Wireshark.
Closing Words
Estimating the amount of communication is essential for the full-scale use of IoT. Especially nowadays, the use of cameras tends to increase communication volume. By taking measurements at least once and confirming the required communication speed and bandwidth, it will be possible to construct a stable IoT system.
This is achievable while keeping costs low, so do take advantage of it.
Hope you enjoyed the article!
………….
Do you have questions about this process or another IoT project? Speak with one of our experts today to learn how Soracom has helped more than 20,000 innovators deploy, scale, and secure their IoT projects.