Reduce Your IoT Threat Surface by Eliminating Public IP
When architecting for IoT, one of the earliest factors to consider is how messages need to move between devices and the cloud. In most cases, devices send messages that include information like sensor data and positioning to the cloud. However, many projects may also require sending data back to the device, such as command directives or returning parsed data. For bidirectional communication requirements, there are two common approaches:
While both of these approaches work well for many bidirectional IoT applications, they both require the device to initiate the connection before any message can be sent from the cloud back to the device. This can be problematic in situations where your cloud-to-device messaging is too infrequent to justify polling or maintaining a socket, if your hardware doesn’t support the appropriate protocols, or if your application requires something different altogether (such as remote SSH access).
For these situations, it’s common to use a service-based approach combined with a public static IP address. By assigning a public IP address to a device, a server can directly access services running on the device (such as a web admin UI, API, or even just SSH) without having to wait for the device to initiate a connection. The tradeoff is that its IP address is publicly accessible, including to third parties, which raises concerns about device security and data protection.
Today, we will look at IP-based communication and how we can eliminate the need for public static IP addresses to create a more secure bidirectional architecture where access to the public internet becomes optional.
Let’s get started!
The public IP approach
Traditionally, sending messages from the cloud to a device over cellular meant requesting your cellular network provider to assign a globally-unique public static IP address to your SIM card. This means that connections from your cloud server back to the device will traverse the public Internet, so encryption is mandatory and must be factored into both the architectural and hardware design.
Since the device’s IP address is publicly accessible, you also need to consider steps to harden the device from attackers, such as password rotation, disabling unused services, and whitelisting incoming connections. Finally, the server itself will also need to be publicly accessible, which raises similar concerns for protecting the server. Here is what a traditional IP-based design pattern over cellular looks like:
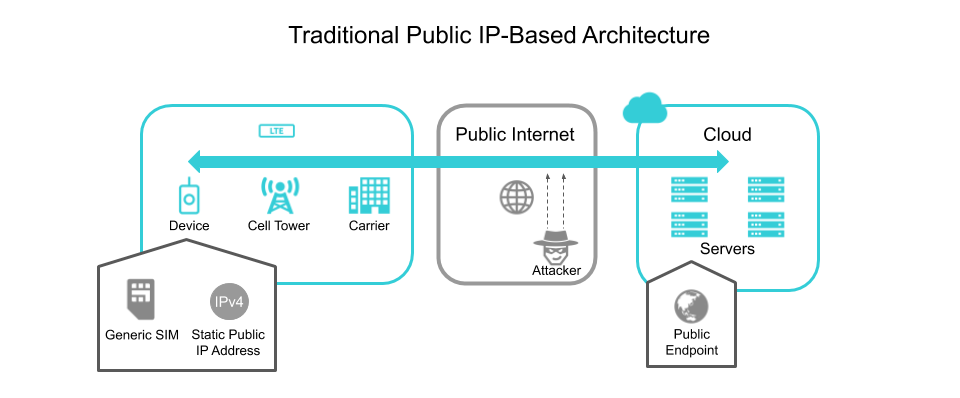
As this architecture traverses the public Internet, you have to take care to ensure that data is encrypted in transit and at rest, as well as protect endpoints from attack. Static public IP addresses pose a risk as they are public-facing and accessible 24/7. Ongoing operational effort is required to ensure that devices are hardened to prevent malicious activity. In addition to security concerns, provisioning IP addresses from traditional carriers can take time, and often require cost-prohibitive commitments and contracts.
Private Networking with Soracom Canal/Door/Direct
First, let’s take a look at how we can build a private network between our devices and cloud, which eliminates the most significant attack vector for malicious snoopers:
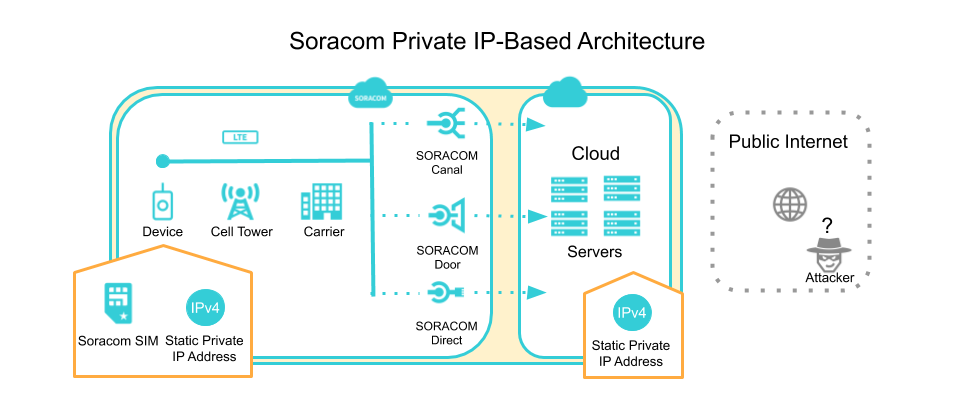
Three primary networking services can be used to create a private network between your devices and the backend. Let’s take a quick look at each one:
Soracom Canal
If your backend services are hosted inside AWS, then Soracom Canal can be used to create a VPC Peering connection between a Soracom Virtual Private Gateway (VPG) which contains your devices, and an AWS Virtual Private Cloud (VPC) which contains your backend services. Aside from VPC Peering, AWS Transit Gateway is also supported for additional flexibility.
Soracom Door
If your backend services reside in a cloud other than AWS, or a data center, then Door can be used to create an IPSec site-to-site VPN between your Soracom VPG and backend network. Soracom handles the VPN connection so that devices do not need to manage any VPN client software.
Soracom Direct
Soracom Direct leverages AWS Direct Connect to run a physical dedicated private line to your datacenter.
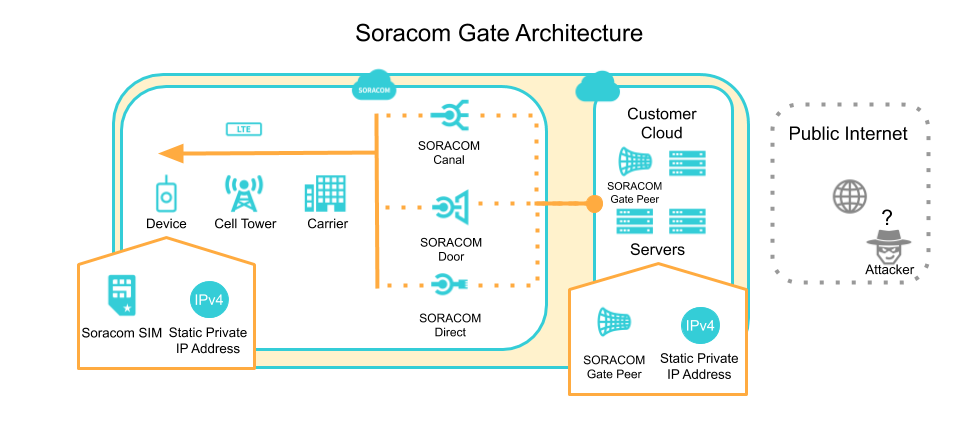
Bidirectional Communication with Soracom Gate
Now that we have established a private network over cellular let’s see what’s required to get packets originating from the cloud side down to our devices. To establish cloud-to-device communication, we will use the Soracom Gate feature.
Soracom Gate uses a VXLAN to connect Gate Peers that reside in your Soracom VPG with the ones that you create in your cloud. These Gate Peers are responsible for sending traffic in between the two environments. When you create a VPG, two gate peers are automatically set up for you on the Soracom side, but you’ll need to set up the corresponding Gate Peer in your backend. This is typically a Linux server running in the cloud that requires specific traffic rules which ensure that data is being routed back to its corresponding Gate Peer in your Soracom Virtual Private Gateway. Here is more info on configuring a Gate Peer. Once this is complete, you’ll be able to send messages from your servers directly to the private IP addresses assigned to your devices within their Soracom VPG.
Where to go from here
With Soracom Gate configured, additional networking features can also be enabled, such as using a private NTP endpoint for highly time-sensitive use cases, and if some access to the public internet is required, creating an outbound filter to keep a whitelist or blacklist of IPs that devices can reach. Soracom customers like Hortau use Gate and Canal to send commands from within their AWS VPC to their devices for remote control. Check out their architecture in our Hortau Case Study.
If you’re looking to implement secure remote device access without the need for additional networking features, Soracom Napter can be used to establish temporary access to devices. Here’s a blog post about using Napter to remotely access IoT devices behind cellular gateways.