
Remotely Access IoT Devices Behind Cellular Routers
There are many benefits to connecting IoT devices behind a cellular router: Since the router handles cellular WAN for all downstream IoT devices, individual devices no longer need to manage their individual cellular connections. This allows the use of lower-spec, lower-cost devices and also reduces the complexity required in the device firmware to manage cellular connectivity.
Using a router can also open up more communication options, allowing the use of Ethernet, WiFi, or Bluetooth connectivity between devices and the router. This flexibility can come in handy when deploying devices to areas where physical obstruction may cause poor cellular connectivity, like tunnels, basements, or high-traffic locations.
While routers add valuable versatility to IoT deployments, they also add a NAT layer between your cloud and your IoT devices. If we want to remotely access those devices, we’ll need to do a little extra configuration. Let’s go over how to set this up in a way that ensures end-to-end security, provides an audit log and is easy to use.
In this example, we’ll be using a Teltonika RUT240 IoT Gateway with a Soracom Air Sim card, but the steps should be similar on most other IoT Gateways. Click here for a full tutorial on setting up a RUT240 with Soracom Air.
Part 1: Set up remote HTTP access to the cellular router
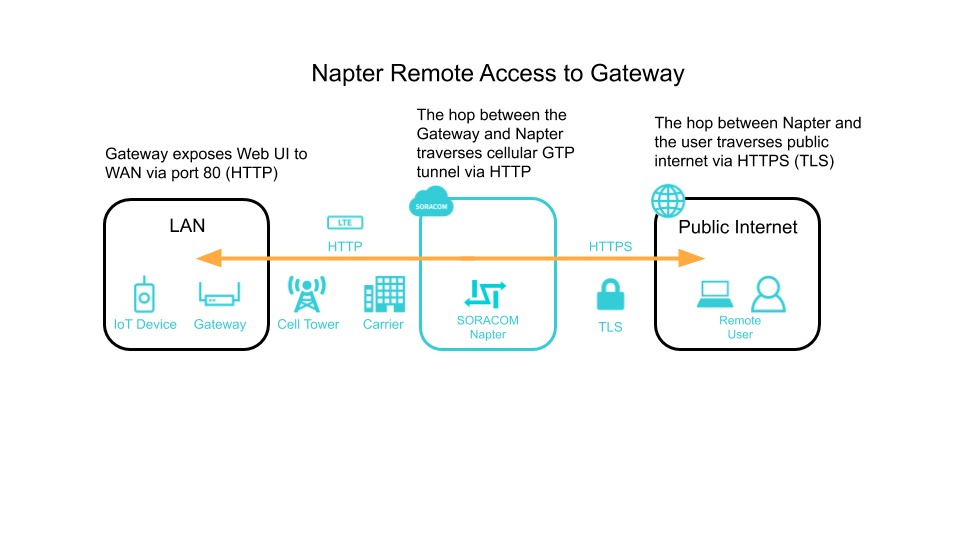
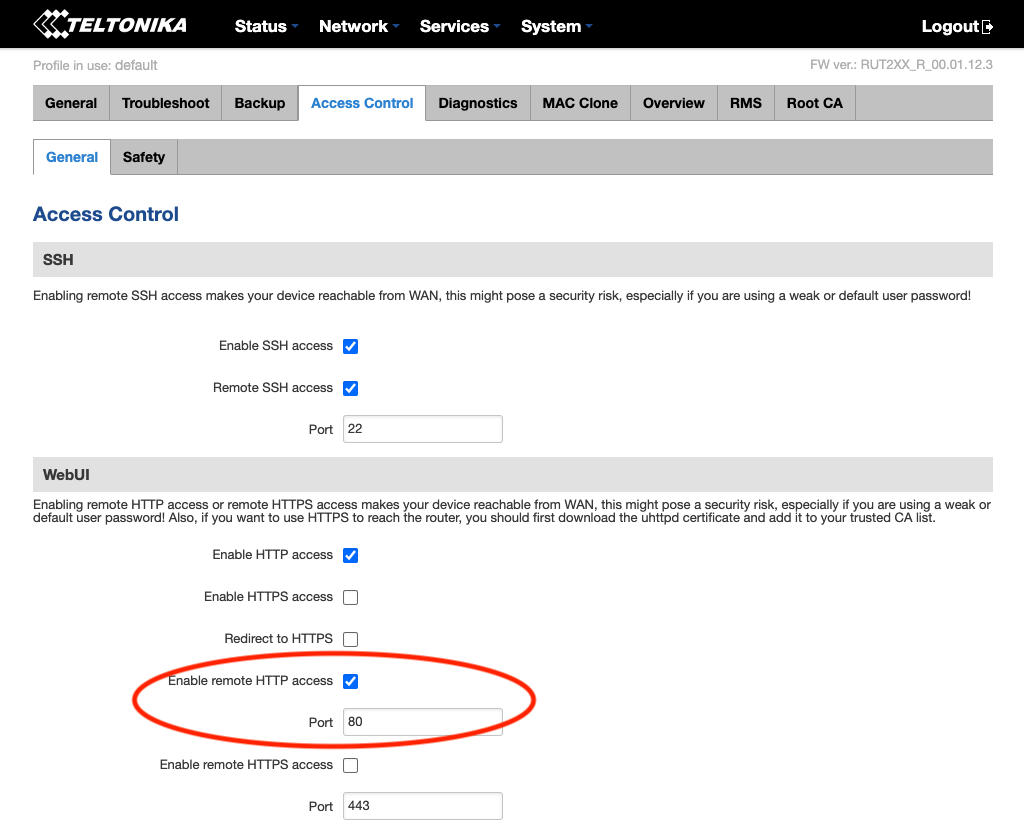
The first step that we’ll want to accomplish is setting up remote access to the cellular router itself. Most routers will allow you to expose their HTTP-based web interface for remote access. Additionally, remote SSH access can also be helpful if the device supports it. On the Teltonika RUT240, both of these protocols can be enabled and configured for remote access by toggling them under System > Access Control > General. In this example, let’s check “Enable Remote HTTP Access” so that we can try accessing this router’s web interface remotely.
Now we should be able to remotely access the router through our web browser via HTTP on port 80. To test this, let’s log into the Soracom User Console and use Soracom Napter to grant temporary remote access.
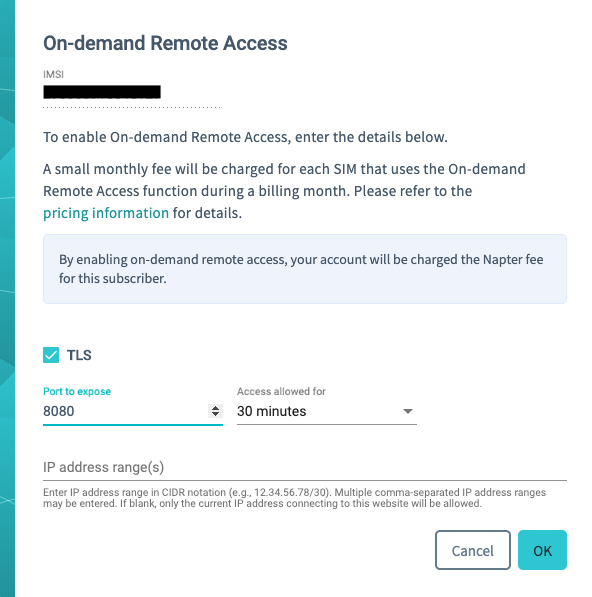
Napter creates temporary URIs that let you access your devices on any port that speaks TCP-based protocols. These URIs are only usable by the IP address/range that you specify and are created out of a random combination of IP addresses and ports for additional security. Also, the URI is terminated after the chosen specified duration, which can be between 30 minutes to 8 hours. This is more secure than traditional public static IP addresses which require diligent upkeep to ensure that malicious actors are not attacking them.
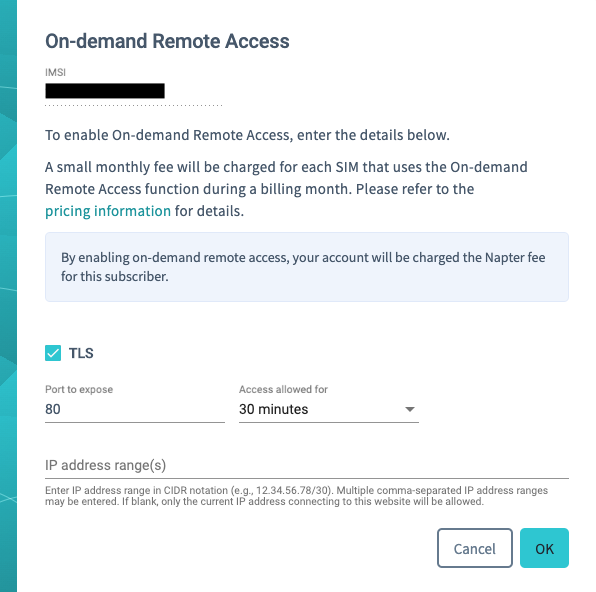
After selecting the SIM card that is in your router, click on “Actions” and then “On-demand Remote Access”. Here, we can enable TLS so that our hop from our computer to Soracom is encrypted. Next, change the port to 80 and keep the other settings default. If you do not specify any IP address ranges to whitelist for this connection, then Napter will pick your current IP. On the next screen, copy the HTTPS URL and open it in a different browser window. You are now securely connected to the router.
Part 2: Setting up Port Forwarding to remotely access downstream devices
Next, we’ll head back into the Teltonika Web UI to configure access to the downstream IoT devices. In this example, we have a Raspberry Pi plugged into the router via Ethernet and is hosting a web page on port 80. Firstly, we’ll want to assign a static IP address or bind the Raspberry Pi’s Mac Address to ensure that the IP assigned to it will not change in the future.
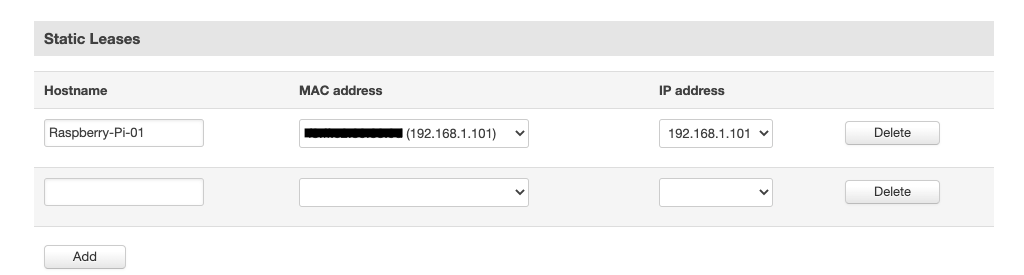
How to set static IP
Go to Network > LAN, and scroll down to the Static Leases section. Under the MAC address dropdown, you should see your IoT Device(s) currently connected to the router’s LAN. Select the device, fill in its Hostname and the desired static IP address, and then hit Add.
How to set up Port Forwarding
Finally, we’ll need to set up port forwarding to reach the Raspberry Pi’s web interface, which is running on port 80 remotely.
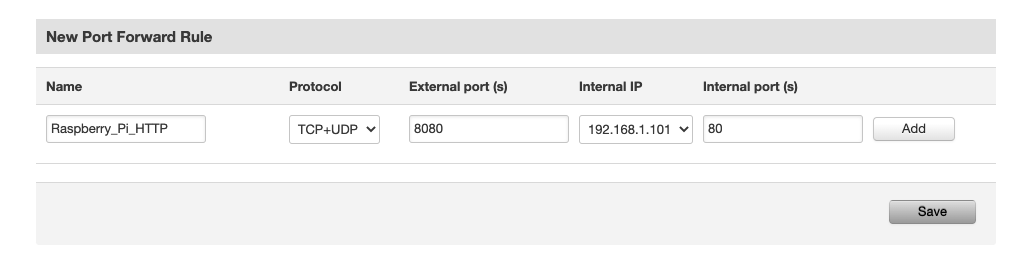
Go to Network > Firewall > Port Forwarding, and scroll down to New Port Forward Rule. Enter a name and leave Protocol to the default. For External port, since we’re already accessing the routers own Web UI via port 80, we’ll want to use a different value to avoid a conflict. For this example, we’ll use 8080. Next, select the Internal IP that we created a static lease for in the previous step. For the internal port, put 80. After you hit the Add button, you should see the new rule show up under the Port forwarding Rules section.
That’s it! Back to Napter to see if we can access the downstream device’s Web interface.
Part 3: Logging remote access
Enabling Audit Logs gives you access to Napter events that have taken place across your Soracom account.
When people in your organization create remote sessions, you see timestamped events that include source IP, destination IP, as well as when the connection was created, accessed, and closed. These logs can also be helpful when troubleshooting issues such as when connections are refused or expired. A full list of event types is listed in the Napter Audit Logs Documentation.
Part 4: Where to go from here?
If you are building your own IoT User Consoles for end customers, integrating Napter via API will allow end-users to gain secure access to their devices all from within your own backend. Let’s see how we can generate the same URLs as we did in parts 1 and 2 programmatically. In this example, we’ll use the API tool built into the Soracom API Reference page.
Firstly, we’ll need to authenticate in the top-right corner of the page. This can be done with your Soracom email and password, but for production use, you’ll want to avoid using root credentials and instead use AuthKey authentication.
Next, navigate to portMapping > createPortMapping and click on the schema icon to see what our request body will look like:
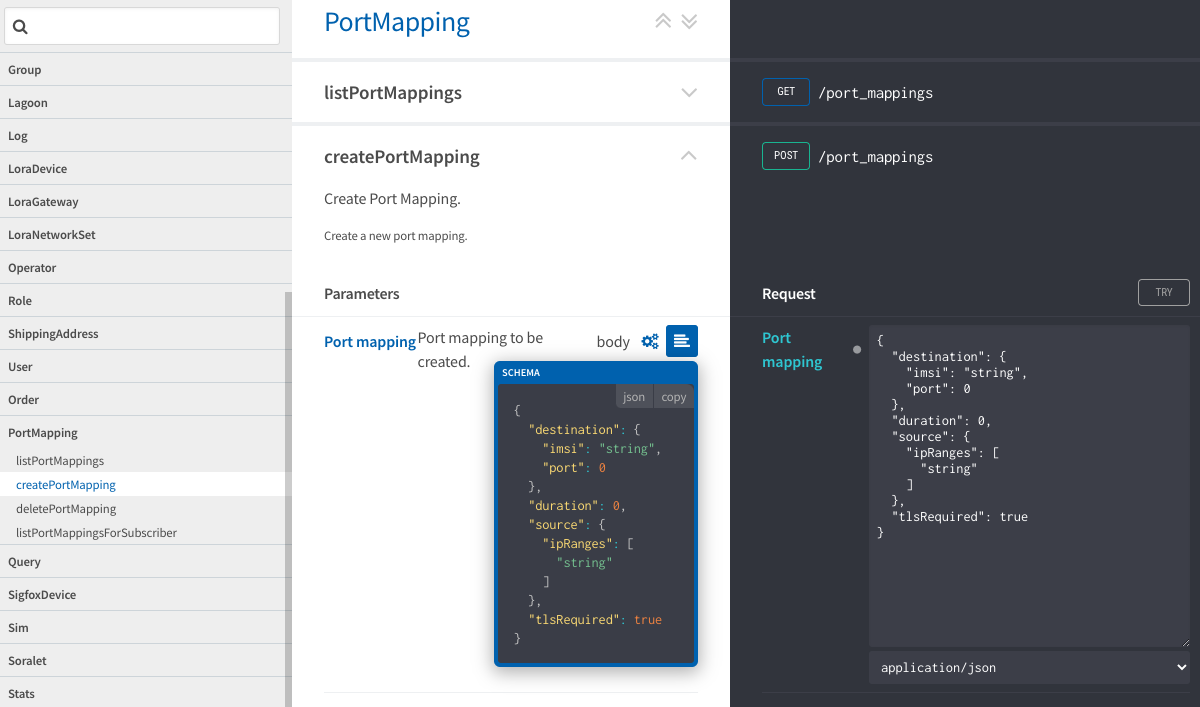
Click on the Copy button to copy the schema over into the Request. From here, we can add our values before clicking Try.
First, we’ll want to add the IMSI of our SIM to imsi. Next is the desired port of either 80 to access the router web UI or 8080 for the downstream device’s web UI. The duration parameter takes a value in seconds, so for a 30-minute session, we’ll want to add 1800. For ipRanges, grab your current external IP address and add a /32 CIDR to the end. We’ll leave tlsRequired as true so that the hop over the public internet from our computer to Soracom is secured. When finished, your request body should look something like this:
{

"destination": {

"imsi": "295000012345678",

"port": 8080

},

"duration": 1800,

"source": {

"ipRanges": [

"put.your.ip.here/32"

]
},

"tlsRequired": true

}
Next, hit the Try button. After scrolling down, you should see a Response Code of 201, meaning that our Napter session was successfully created. In the response body, you should see a hostname and port.
From a new browser window, you’ll want to construct the URL for remote access like this:
https://[your_hostname_value]:[your_port]
Please keep in mind to use the port value returned from the API and not the one from your request. Congratulations, you should now be able to access both the router and device web UI from API or from the Soracom User Console.


MORE LIKE THIS


What is Soracom?
Discover why technology innovators choose Soracom for connecting their
devices to the cloud over cellular.
Soracom's Picks
Advices and interviews, to inform and inspire.

Catch the Traffic Before You Cut It Off: Auto-Capturing a PCAP with Event Handler + Soracom Flux
TL:DR The 10 GB Weekend A field device sits on…

Retail’s “Invisible” Workforce: How IoT-Enabled Vending and Kiosks Are Rewriting the Rules of the Brick-and-Mortar Experience
TL;DR Walk through a modern shopping mall before the anchor…

Security Shouldn’t Depend on the Device: Introducing Soracom Traffic Filtering
TL:DR There’s a quiet paradox at the heart of IoT…


Cloud Native
IoT Connectivity Platform
Soracom built the worlds first cloud-native connectivity management platform, built on AWS. Learn more about going beyond connectivity.