
Park&Go: Smart Parking System for Vehicles
Things used in this project
Hardware components

|
Raspberry Pi 3 Model B | × 1 |

|
Camera Module | × 1 |

|
SORACOM Air Global IoT SIM | × 1 |
| Huawei 3G USB dongle (MS2131i) | × 1 | |

|
Ultrasonic Sensor - HC-SR04 (Generic) | × 1 |
Software apps and online services

|
Raspbian | × 1 |
|
|
VS Code | × 1 |

|
AWS EC2 | × 1 |

|
SORACOM Air IoT Connectivity Platform | × 1 |
| Ideamart API | × 1 |
Hand tools and fabrication machines

|
10 Pc. Jumper Wire Kit, 5 cm Long | × 1 |
Story
Introduction
These days smart parking is not a wondering concept in many smart city projects. However most of the time we need to use ticketing machines manually or a mobile app to allocate spot and paying for it. These things consume additional time of our daily routines and being overheads of normal procedure. Imagine that if you don't need to do these extra things and you need just to park your vehicle and go away. And at the end of the day you will be charged a fair amount automatically from your mobile. This would be kinda easy right?
Park&Go suggest this type of solution and it is based on computer vision and it can be automated the whole process. So you don't have to worry about fines of illegal parking and this system will take care of it.
This project also stimulate UNDP sustainable goals by promoting sustainable industries & innovation (Goal 9) and improving urban planning and management in participatory & inclusive ways (Goal 11).

What Is SORACOM?
Soracom is an IoT connectivity solutions provider and works like a Mobile virtual network operator (MVNO). It offers a global connectivity for all types of IoT devices from various network technologies like cellular (2G/3G/4G) and liberalize IoT cellular connectivity, enabling developers to productize IoT quicker, cheaper, and more securely. Their cellular connection to the cloud bypasses the limitations of the internet, sets up to remotely manage devices around the world without borders.
So you need just a Soracom Global IoT SIM with a relevant data plan.

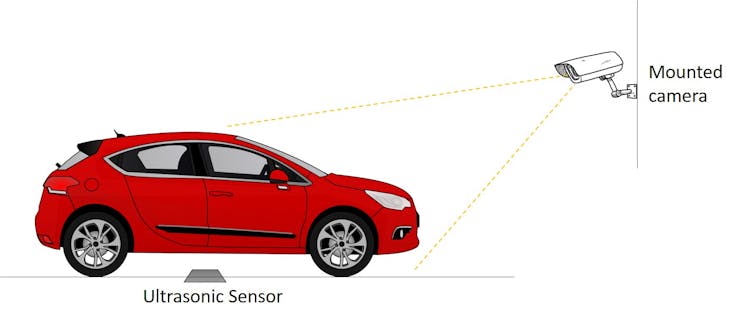
Let's move on to the physical setup of Park&Go system. In this proposing system, we can use existing CCTV camera feed can be used to recognize vehicle number plate and identify owner by accessing cloud database, then it can be charged for parking time duration. We can mount ultrasonic sensor on the ground for relevant parking spots to clarify presence of the vehicle. When vehicle is at right position, we can notify driver/owner that charging will be initiated through SMS or push notification.
Getting Started
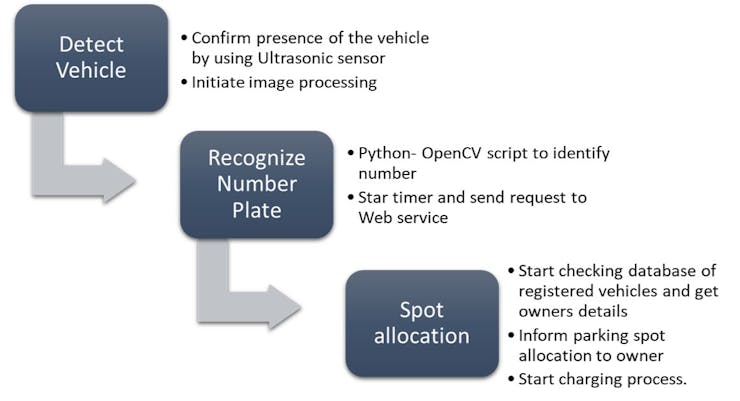
Let's begin with following flow diagram. According to that, firstly we need to detect vehicle by using ultrasonic positioning to initiate the image processing by getting images of front of vehicle. Then we need to use filters and algorithms to extract the number plate area and read the vehicle number. Afterwards, we can send the number to the AWS cloud to find the who is the owner of vehicle. For this we need access to the government vehicle registry. Next, we send a notification to the driver/owner that parking spot is allocated for their vehicle and starting the timer to measure parking time duration. After leaving the spot, the vehicle owner will receive a charging receipt to their mobile device.
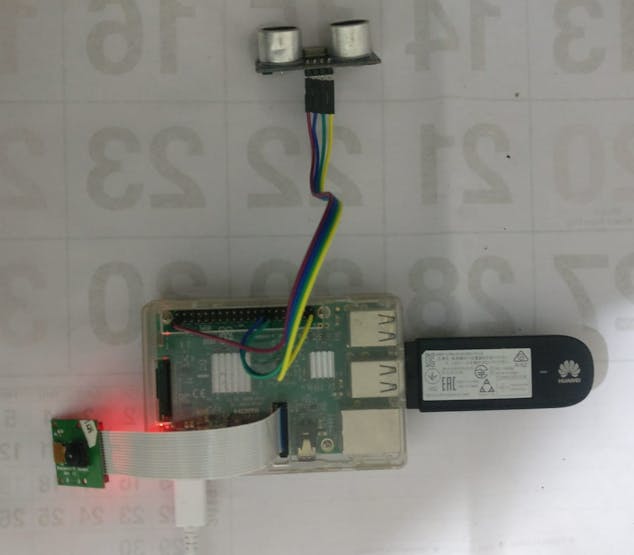
In here, we are using a Raspberry Pi 3 Model B development board to run image processing. Instead of this, we can use Pi Zero when we go for a production. Instead of CCTV camera, we are going to use PI Camera for this prototype and Soracom SIM inserted Huawei dongle is used for cellular connectivity.
Python-OpenCV is used to develop image processing part and it will send to the vehicle details to the AWS hosted web app. This web app uses Ideamart APIs to send SMS and charge from mobile balance.
Ideamart is a platform presented by Dialog Axiata to developers and content providers to use multiple telecom infrastructure (MNO) based features via shared APIs and monetize their efforts.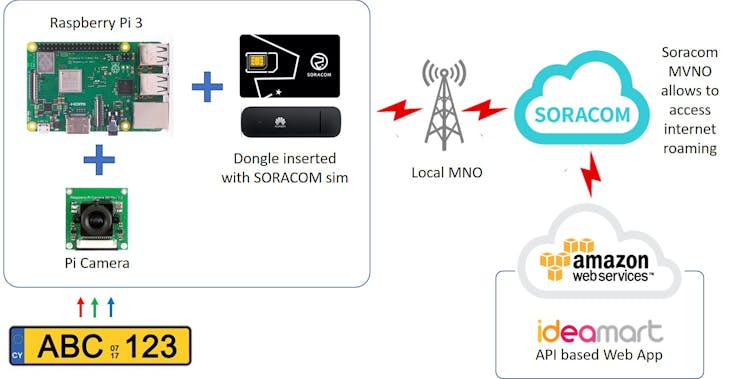
Hardware
Let's consider hardware setup. Firstly, you need to have Raspbian installed PI 3 board. By default It is pre-installed python 3. But you have to install OpenCV for python by yourself. You can read this tutorial to know how it can be done.After successful OpenCV installation, you need to connect Soracom inserted dongle to the board and also your ultrasonic sensor to desired GPIO pins. The Pi Camera should be connected to the relevant camera peripheral interface.
 Now the hardware setup is complete. Before using Soracom connectivity, we need to register our SIM card by using Soracom console. For that, you need to go console.soracom.io and If you haven’t a account already, create a user account Once you are logged in, you’ll need to register your SIM by entering ICCID (Integrated Circuit Card Identifier) which is written on the SIM.
Code Explanation
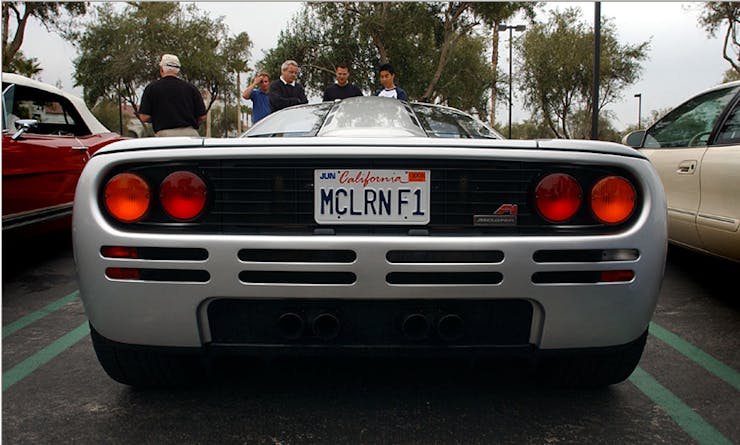
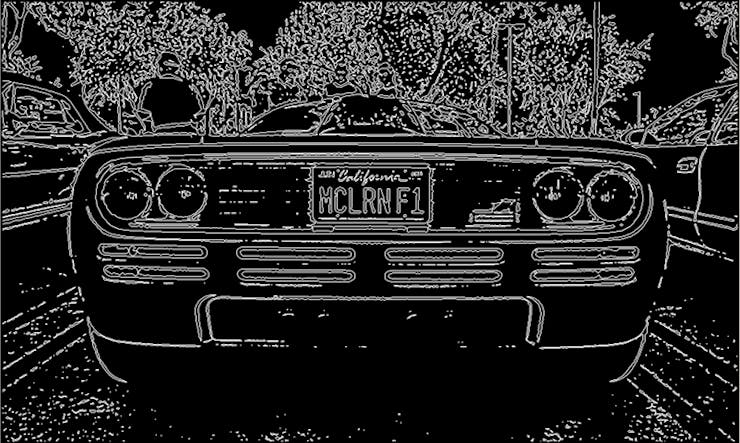
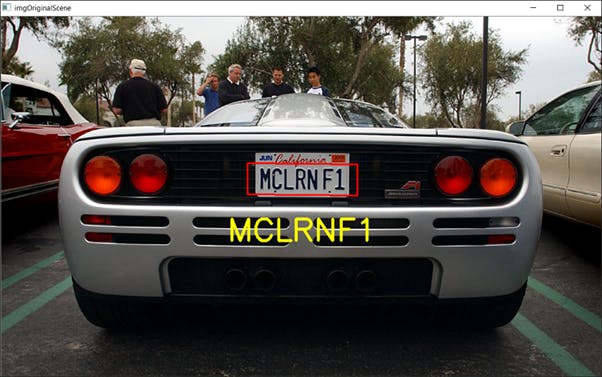
Let's begin the coding part of image processing that runs on Raspberry Pi. Let's create main.py which is the main module.# Main.pyimport cv2import numpy as npimport os import DetectCharsimport DetectPlatesimport PossiblePlate # module level variables #SCALAR_BLACK = (0.0, 0.0, 0.0)SCALAR_WHITE = (255.0, 255.0, 255.0)SCALAR_YELLOW = (0.0, 255.0, 255.0)SCALAR_GREEN = (0.0, 255.0, 0.0)SCALAR_RED = (0.0, 0.0, 255.0)showSteps = False def main(): blnKNNTrainingSuccessful = DetectChars.loadKNNDataAndTrainKNN() # attempt KNN training if blnKNNTrainingSuccessful == False: # if KNN training was not successful print("\nerror: KNN traning was not successful\n") # show error message return # and exit program # end if imgOriginalScene = cv2.imread("LicPlateImages/1.png") # open image if imgOriginalScene is None: # if image was not read successfully print("\nerror: image not read from file \n\n")# print error message to std out os.system("pause") # pause so user can see error message return # and exit program # end if listOfPossiblePlates = DetectPlates.detectPlatesInScene(imgOriginalScene) # detect plates listOfPossiblePlates = DetectChars.detectCharsInPlates(listOfPossiblePlates) # detect chars in plates cv2.imshow("imgOriginalScene", imgOriginalScene) # show scene image if len(listOfPossiblePlates) == 0: # if no plates were found print("\nno license plates were detected\n") # inform user no plates were found else: # else # if we get in here list of possible plates has at leat one plate # sort the list of possible plates in DESCENDING order (most number of chars to least number of chars) listOfPossiblePlates.sort(key = lambda possiblePlate: len(possiblePlate.strChars), reverse = True) # suppose the plate with the most recognized chars (the first plate in sorted by string length descending order) is the actual plate licPlate = listOfPossiblePlates[0] cv2.imshow("imgPlate", licPlate.imgPlate) # show crop of plate and threshold of plate cv2.imshow("imgThresh", licPlate.imgThresh) if len(licPlate.strChars) == 0: # if no chars were found in the plate print("\nno characters were detected\n\n") # show message return # and exit program # end if drawRedRectangleAroundPlate(imgOriginalScene, licPlate) # draw red rectangle around plate print("\nlicense plate read from image = " + licPlate.strChars + "\n") # write license plate text to std out print("----------------------------------------") writeLicensePlateCharsOnImage(imgOriginalScene, licPlate) # write license plate text on the image cv2.imshow("imgOriginalScene", imgOriginalScene) # re-show scene image cv2.imwrite("imgOriginalScene.png", imgOriginalScene) # write image out to file # end if else cv2.waitKey(0) # hold windows open until user presses a key return# end main def drawRedRectangleAroundPlate(imgOriginalScene, licPlate): p2fRectPoints = cv2.boxPoints(licPlate.rrLocationOfPlateInScene) # get 4 vertices of rotated rect cv2.line(imgOriginalScene, tuple(p2fRectPoints[0]), tuple(p2fRectPoints[1]), SCALAR_RED, 2) # draw 4 red lines cv2.line(imgOriginalScene, tuple(p2fRectPoints[1]), tuple(p2fRectPoints[2]), SCALAR_RED, 2) cv2.line(imgOriginalScene, tuple(p2fRectPoints[2]), tuple(p2fRectPoints[3]), SCALAR_RED, 2) cv2.line(imgOriginalScene, tuple(p2fRectPoints[3]), tuple(p2fRectPoints[0]), SCALAR_RED, 2)# end function def writeLicensePlateCharsOnImage(imgOriginalScene, licPlate): ptCenterOfTextAreaX = 0 # this will be the center of the area the text will be written to ptCenterOfTextAreaY = 0 ptLowerLeftTextOriginX = 0 # this will be the bottom left of the area that the text will be written to ptLowerLeftTextOriginY = 0 sceneHeight, sceneWidth, sceneNumChannels = imgOriginalScene.shape plateHeight, plateWidth, plateNumChannels = licPlate.imgPlate.shape intFontFace = cv2.FONT_HERSHEY_SIMPLEX # choose a plain jane font fltFontScale = float(plateHeight) / 30.0 # base font scale on height of plate area intFontThickness = int(round(fltFontScale * 1.5)) # base font thickness on font scale textSize, baseline = cv2.getTextSize(licPlate.strChars, intFontFace, fltFontScale, intFontThickness) # call getTextSize # unpack roatated rect into center point, width and height, and angle ( (intPlateCenterX, intPlateCenterY), (intPlateWidth, intPlateHeight), fltCorrectionAngleInDeg ) = licPlate.rrLocationOfPlateInScene intPlateCenterX = int(intPlateCenterX) # make sure center is an integer intPlateCenterY = int(intPlateCenterY) ptCenterOfTextAreaX = int(intPlateCenterX) # the horizontal location of the text area is the same as the plate if intPlateCenterY < (sceneHeight * 0.75): # if the license plate is in the upper 3/4 of the image ptCenterOfTextAreaY = int(round(intPlateCenterY)) + int(round(plateHeight * 1.6)) # write the chars in below the plate else: # else if the license plate is in the lower 1/4 of the image ptCenterOfTextAreaY = int(round(intPlateCenterY)) - int(round(plateHeight * 1.6)) # write the chars in above the plate # end if textSizeWidth, textSizeHeight = textSize # unpack text size width and height ptLowerLeftTextOriginX = int(ptCenterOfTextAreaX - (textSizeWidth / 2)) # calculate the lower left origin of the text area ptLowerLeftTextOriginY = int(ptCenterOfTextAreaY + (textSizeHeight / 2)) # based on the text area center, width, and height # write the text on the image cv2.putText(imgOriginalScene, licPlate.strChars, (ptLowerLeftTextOriginX, ptLowerLeftTextOriginY), intFontFace, fltFontScale, SCALAR_YELLOW, intFontThickness)# end function if __name__ == "__main__": main()Let's get a sample image and do the steps of image processing. Following sample image ishows original capture of a vehicle.
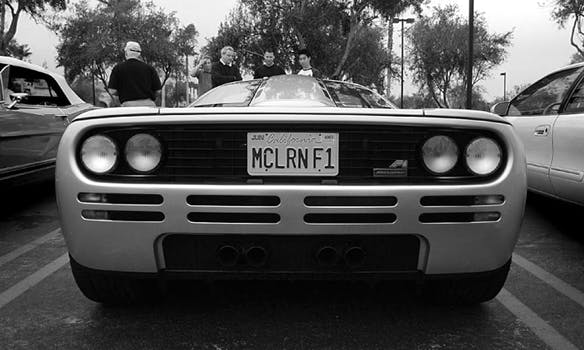
Then you need to do some pre-processing like converting to grayscaled and thresholding as follow.
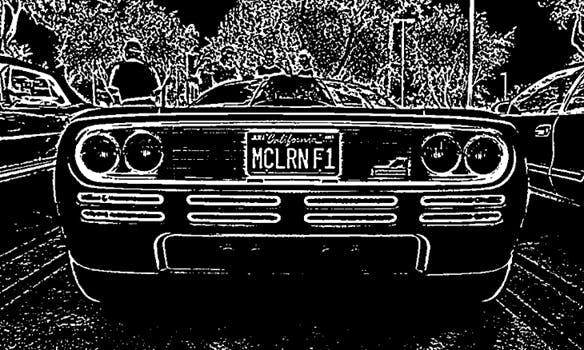
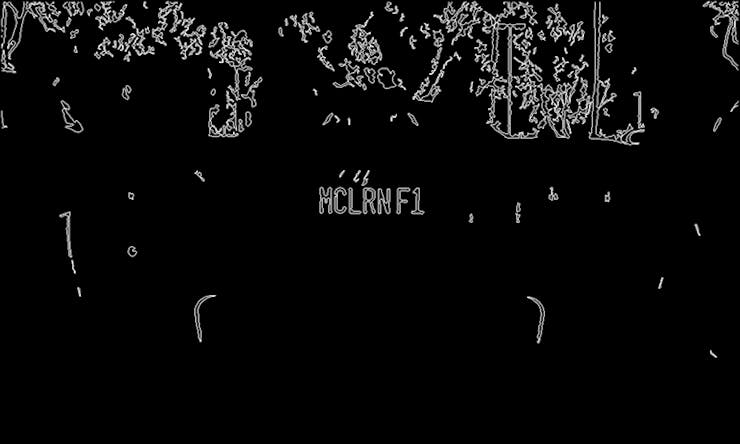
Next, you need to find possible characters by scanning all contours over the image.
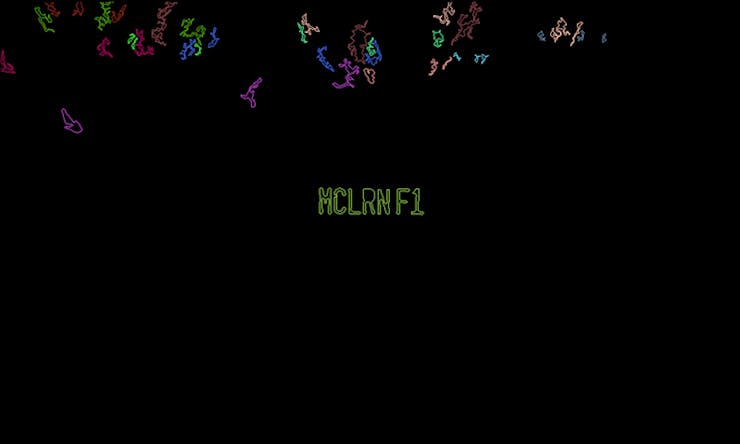
Afterwards, you need to obtain vector of posibble characters in the images as following.
Again, you need to get vector of vectors regarding matching characters.
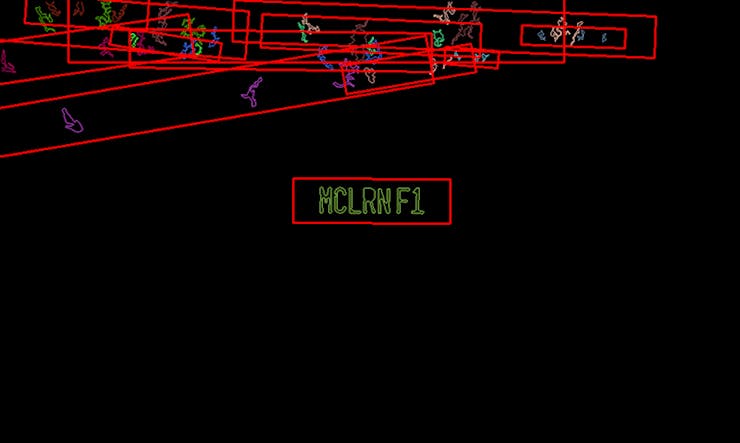
Now, we can extract all the possible plates like below.
Then, we need to get separately those extracted plates and again do the pre-processing part like converting to Grayscaled and thresholding.


Next, repeatedly find possible characters in the plates.

Again, getting matching vectors of possible characters.

Now you need to remove inner overlapping characters in the image.

Within each possible plate suppose the longest list of potential matching characters is the actual list of characters. Now we have identified below area has the longest list of characters. It means this is the right plate.

Now you can recognize the all the characters in the plate accurately.

This is it! We did recognizing the number plate and reading the number. As you can see it is the right one.
Now we have to send a json to inform our AWS hosted web app.
import httplib, json headers = { "charset" : "utf-8", "Content-Type": "application/json" }conn = httplib.HTTPConnection("localhost")sample = { "plate_number" : "ABC-1234","start_time" : "xx:xx:xx", "end_time" : "yy:yy:yy", "location" : ["xx,xx","yy:yy"],"charging_fee" : 123 }sampleJson = json.dumps(sample, ensure_ascii = 'False') # Send the JSON data as-is -- we don't need to URL Encode thisconn.request("POST", "host_name/consumer.php", sampleJson, headers)response = conn.getresponse()print(response.read())conn.close()Now edge part is over. Then we have to consider cloud part which is the development of web app. In this web app, we need to handle the requests from Raspberry PI and call Ideamart APIs. Also we need to access Vehicle registration database. But for this prototype we will ignore it because it need a legal agreement with local authorities.
You can study about Ideamart APIs by clicking here. To send notifications to owner's mobile, it can be used Ideamart SMS API and charge from Mobile balance it can be used Charging-as-a-Service(CaaS) API. You can learn more about how to create a Ideamart account from here.This web app will be host on AWS EC2 instance. We are using PHP language to write this web app.
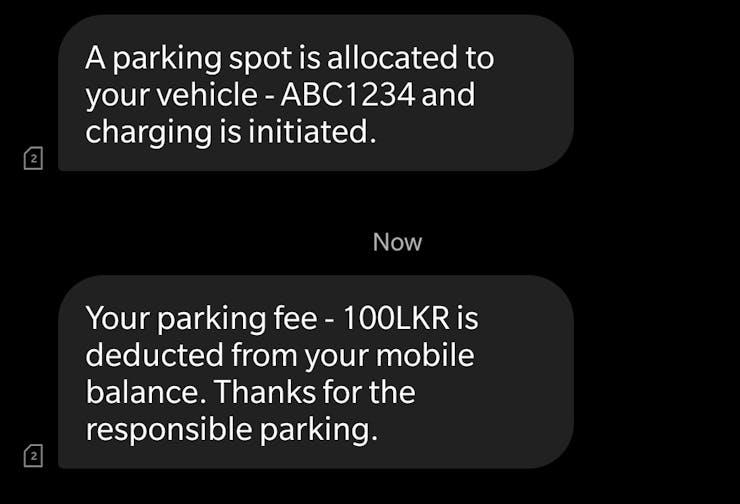
<?phprequire 'ideamart-0.0.1.php';$appid = "APP_000001";$apppassword = "password";try { $receiver = new SMSReceiver(); $address = $receiver->getAddress(); //get owner's number from database $message = $receiver->getMessage(); //get parking fee // Setting up CAAS $cass = new DirectDebitSender("https://api.ideamart.io/caas/direct/debit",$appid,$apppassword); $sender = new SmsSender("https://api.ideamart.io/sms/send", $appid,$apppassword); try { $cass->cass("123","tel:94771122336","40"); $sender->sms("Your parking fee - ".$message."LKR is deducted from your mobile balance. Thanks for the responsible parking.",$address); } catch (CassException $e) { $sender->sms("You do not have enough money",$address); } } catch (Exception $e) {}?>Following example demonstrate the messages received from above created web app and first message inform that parking spot is allocated to your vehicle then second message inform that charging is processed from your mobile wallet balance.
Conclusion
The proposing system is fully autonomous because there is no requirement of human interaction. Furthermore we can develop a mobile app and all the free parking spots will be shown real-time and if there is a free space you can just park your vehicle in there and go away without any manual ticketing. Additionally, this system can be developed to take care of your vehicle during stay at spot and unusual situations will be detected and sending you the notifications. So it saves your time and labor cost for caring.
For a better optimization we can apply machine learning algorithms to this application and it will increase accuracy of vehicle recognition and overall system productivity.
At last this will be super easy method for parking without any harsh. From other point of view it is perfect solution for municipal authorities and private sector companies to manage and monetize their parking spaces.
That's the end of the tutorial and hope you enjoyed Park&Go!